 “Try not to make too many ruts,” my brother said before we pulled forward onto his property in Michigan. Not wanting to repeat our experience of having to be towed, we had called him the day before to check on the wetness of the land. Steve assured us we’d be able to park in his farm yard. “That thing is heavy,” were the next words out of his mouth as he assessed the damage left by Tagalong’s weight sinking into the soft ground, a result of 4 inches of rain the week before and ½ inch that morning. Bob spun our 18,000-pound trailer around so he could back it into position, carving 6-inch deep ruts in the process. I guess you could say we made a mark with our RV. As Bob stepped on the gas pedal to back into place, our heavy rig moved only slightly before Gulliver’s dually tires spun out, gouging even deeper ruts. Gulliver couldn’t push Tagalong out of the deep-seated grooves in reverse. Driving in forward instead likely would have been a different story.  A Sticky Situation In bare feet (his norm), Steve ran over to get his Jeep. For the third time in our five years of full-time RV living, we had gotten Gulliver and Tagalong stuck. Only this time, we didn’t have to rely on a commercial tow truck or the goodness of fellow campers — and four-wheel drive likely wouldn’t have prevented this sticky situation. Although we didn’t pick up tire chains like tow truck driver Cody had advised after rescuing us from Jim and Jenny’s front yard nearly two months earlier, we were prepared with a sturdy tow strap, and Steve was prepared with a Jeep. Bob connected the strap to the back of Tagalong, and Steve attached it to the front of his Jeep.  This time as Bob attempted to back up, Steve helped pull Gulliver and Tagalong out of the ruts they’d created and farther back in the yard. But we didn’t get fully into position before stopping … and getting stuck again. Steve repositioned his Jeep, and he and Bob doubled the strap to shorten the connection between the two vehicles. We were running out of yard space. The trailer wouldn’t budge. Unable to move our big rig back any farther, we considered our location good and separated the Jeep from the trailer. I stacked two boards in front of Tagalong’s driver-side tires, and Bob drove forward to pull the trailer onto them and make it level side to side. Then we ran through our normal checklist to disconnect Tagalong from Gulliver and set up camp.  Piece of Paradise
We’re enjoying farm living in Michigan, eating fresh produce, listening to the natural sounds of cows lowing, birds singing, roosters crowing, farmers plowing, mowers humming, and children playing. Cool breezes refresh us, walks down the dirt road invigorate us, and hearty farm cooking makes us rub our bellies in delight — and fullness. Rural life has a lot of appeal. Each farm offers an escape from the hustle and bustle of city life where life is simpler and more serene. It can also be an incredible amount of work for those who choose to take advantage of its fertile soil and wide expanse. Our appreciation for those hard workers grows every time we find ourselves in a rural area, which is much more often than not. In our wake, we’re leaving Steve even more work to clean up our tracks — and a mess to meander when he mows. He has a plan to restore the surface of his yard. We hope carrying it out goes smoothly. You might also like The Benefits of Moochdocking.
1 Comment
 Since 2017, Bob and I have volunteered to go on tour for two to three weeks every summer with the Commemorative Air Force Airbase Arizona. Bob first went in 2016. It took him a year of inviting me to activities at the airbase when we lived in the Phoenix area before I finally agreed to become a member. I haven’t looked back since. We had planned to head east this year on our travels before we knew the B-25J Mitchell and B-17G Flying Fortress WWII bombers were going to do the same. As a result, we found ourselves in somewhat close proximity to them many times. In fact, we visited the tour stop in Ashland, Virginia, when we were in that state. Typically, we board a commercial airline to one of the warbird tour stops and then fly with the B-25 or both the B-25 and B-17 to the next couple of stops before flying home on an airliner. This year, we got a call from the airbase crew scheduler asking if we could help at a stop that wasn’t part of our scheduled tour segment. Since we were in the vicinity, we decided to pitch in. That meant delaying our trip from Massachusetts to Michigan to fit in a weeklong stay at a campground in Plattsburgh, New York. And that meant Gulliver got to go on his first warbird tour. Historical Significance Plattsburgh is only about 20 miles from the Canadian border. The Plattsburgh International Airport, situated on the shore of the 435-square-mile Lake Champlain, was once the Plattsburgh Air Force Base. It still features the buildings and tower that hearken back to its military days in the 1950s, during the Cold War. But the airfield’s history doesn’t start there. The airport is actually known as “the longest active military installation in the U.S.,” dating back to the Revolutionary War, with involvement in every American war thereafter until the airbase's closure in 1995. Designated as a base for Strategic Air Command, the airport’s runway spans 11,750 feet and stretches 200 feet wide. Its size made it an alternate landing site for the Space Shuttle between 1981 and 2011. During WWII, the base served as home to B-47 Stratojet and FB-111 Aardvark bombers. So it made for an ideal stop on our warbird tour — other than the extra long runway. (The passengers didn’t mind, as it gave them a longer ride experience.) Call of Duty We arrived in Plattsburgh on a Sunday and watched the B-17 fly in the next day. While I worked, Bob spent most of the week wrenching on the B-17, which was due for its 100-hour inspection. Since he’s a certified A&P (airframe and powerplant), he needed to be there to sign off on the maintenance work. I was able to carve out a few hours during the week to help train two new ride coordinators on the flight system and proper procedures.  Gulliver transported us to and from the airport (about 3 miles from our campground), as well as to and from restaurants and the hotel where the rest of the crew stayed. He also helped shuttle crew members between locations and hauled tools and supplies from a hangar to the tour trailer after the maintenance was complete.  Gulliver was even on standby to tug the B-17 out of the hangar for its engine check but didn’t get called on. Instead, a tug did that job.  I took off Friday from work to help with the tour stop. Weekends on tour tend to be quite busy as passengers arrive for flight operations on both planes and purchase souvenirs from the tour trailers before we open for static tours on the ground. Then, people from the community show up to climb through the planes, take pictures, and buy mementos. The weekend in Plattsburgh was no different.
I helped as a ride coordinator and flight loadmaster, looking over passengers and engines during flights. Bob pitched in wherever needed. The B-25 arrived Friday afternoon as we were wrapping up flights on the B-17 for the day. After two full days on the airplane ramp, we packed up Tagalong and hooked him up to Gulliver. The next morning, we parked our rig at the fixed base of operations for the last day of flight ops for the tour stop. We stayed for a couple of hours before Gulliver whisked us away to our next destination, grateful for the part he played on the warbird tour. You might also like RV Living vs. Vacation.  Of the three main types of camping — hookups at a campground, boondocking off the grid, and moochdocking — the last has a lot of appeal, for a number of reasons. Let’s look at the benefits of moochdocking. What Is Moochdocking? Moochdocking is the term we use to refer to parking our rig on the property of family or friends. This can range anywhere from a driveway to a spacious farm. Although no two moochdocking setups are identical, they usually include some sort of electric hookup, a way to get water, and laundry facilities.  Some arrangements have beefier electric hookups than others. With a normal 15-amp circuit, we can run the essentials in our fifth wheel: lights, outlets, refrigerator, electric water heater — and charge our laptops and phones. And if we switch the refrigerator from electric to propane and turn off the electric water heater, we can use our microwave. With a 30-amp circuit, we can also run one of our two air conditioner units. Depending on the time of year, we may not need that option. With a 50-amp circuit, we can easily power everything inside our rig all at the same time, including both air conditioners, the microwave, refrigerator, electric water heater, vacuum, and more. Dedicated Time with Friends and Family One of our favorite aspects of moochdocking is the time it affords us to catch up with family and friends. By staying at the homes of loved ones, we get to enjoy meals with them, fun activities, reminiscing, and lots of laughter. Thanks to our affiliation with the Commemorative Air Force and our experience with Continental Singers and Orchestra (where we met), we know lots of people across the country. With those friends and our spread-out family members, we have someone to visit in nearly every state. Moochdocking offers us more frequent opportunities to see those loved ones than we’d get living in sticks and bricks. Cost Savings As you might imagine, mooching electricity and water from others helps the bank account. And by spending time with our hosts, we tend to take fewer trips in Gulliver during a stay, which saves on diesel costs. That’s not to say we take advantage of loved ones in this type of setup. Quite the contrary. We realize the blessing it is to spend time with and benefit from family and friends’ generosity and are quick to compensate where possible. That compensation can come in the form of cooking meals (something Bob loves to do and is really good at), helping with home projects, reimbursing toward an electric bill, or taking our hosts out for a fancy meal — or a combination of things. Longer Stays As a result of the cost savings and additional resources moochdocking offers, we’re often at liberty to stay in one location longer. By using hosts’ bathroom and kitchen facilities, our black and gray wastewater tanks don’t fill up as quickly as they otherwise would. This in itself provides a number of benefits. We have more time to help with projects, more time to catch up with people we haven’t seen in a long time, and more time to investigate the area. That’s how we were able to do quite a bit of exploring in Virginia, for example. It’s also why we were able to get a true Cajun experience in Louisiana.  Longer stays also give us opportunities to take care of needed maintenance and repairs on our rig. The key is not wearing out our welcome so that we can return for another visit.
Helping Others We’ve always enjoyed gaining and employing skills and experience by doing manual labor. With moochdocking and longer stays, we’re more readily available to pitch in on various projects, and we take joy in it. I once termed this “tradedocking” — working for a free place to stay. Not only does this help family and friends, but it also gives us memories together. We helped paint, renovate a bathroom, lay laminate flooring, upgrade computers and equipment, do construction projects, trim trees, and more. Sleeping in Our Own Bed One of the biggest benefits of moochdocking is being able to visit loved ones for a week or more and sleep in our own bed every night. As the saying goes, “There’s no place like home.” Likewise, there’s no place like our own bed for a good night’s rest. Moochdocking is a truly welcome experience. We’re thankful for our many friends and family scattered across the country, both those who have space for us and those who don’t. Being able to visit you all is a blessing we treasure. You might also like 4 Perks of Full-Time RV Living.  The weather warmed up in Virginia, indicating the time had come for us to move on. So, we headed north to Massachusetts, trading nearly 90-degree temperatures for pleasant 70s. After two beautiful days, a heat wave brought sweltering, unseasonable 90-degree temps, giving us an extremely warm welcome. Moochdocking at Bob’s brother Bill’s, we were plugged into a 15-amp circuit for electricity, which meant we couldn’t run air conditioning in our trailer. Operating even one of our two air conditioners requires 30 amps of power. We opened all of our windows and turned on our RV vent fan in the ceiling to help propel any hot air out. Despite our efforts, Tagalong couldn’t combat the area heat advisory that brought hot temperatures and high humidity with a heat index of up to 99. The thermostat in our bedroom peaked at 97 degrees. With sweat beading on our foreheads and pooling in our arm and knee pits, we were driven out of the RV. Thankfully, we were able to hang out in the air-conditioned house.  Unlike summers in Arizona, where even nighttime temperatures hover around 100 degrees, the air in Massachusetts cools as the sun fades, making it possible for us to sleep in our own bed. On the hottest day, our bedroom thermostat displayed a balmy 87 degrees at bedtime. With fans in front of our bedroom windows pulling in cool outdoor air and our ceiling vent fan moving out hot air, we were able to doze off. Hope on the Horizon The only way to run Tagalong’s air conditioners in low-powered conditions like we found ourselves in was to power up two generators, something we’d never used them for. Since we were parked between two houses in a small community, we thought we better not try that. We had been wanting to replace our power inverter for a while for one that would allow us to combine energy from shore power and our solar panels. Evicted from our rig, we decided to fork out the nearly $2,000 to purchase the unit. And to our surprise, we found it on sale for 40% off. That sealed the deal. Before the part arrived, Bob watched videos and researched how to install the unit. Equipped with that knowledge, he ordered some other parts for the installation. Delivery day came. We had ordered a 12-volt unit. We received a 48-volt one, not compatible with our battery setup. Bob called customer service after normal business hours. The out-of-country rep said he made a call to the warehouse and received confirmation that the correct unit was in stock and would be shipped to us — scheduled to arrive a whole week later. The delay risked our ability to install and benefit from the unit before departing Massachusetts. While we waited for the replacement, Bob prepped the trailer: changing our three lithium iron batteries to lay on their sides, lowering the shelf above them to allow more room for the larger unit, and changing wires and connectors to accommodate the higher power of the new unit. Anticipation
The replacement arrived a day early. Yay! Only it was the wrong unit … again, the same model we had received the first time. Bob quickly sent it back. Lacking confidence that Amazon could provide what we requested, he ordered the correct unit — for the same price — from a different vendor. With time running out and the Fourth of July holiday potentially affecting shipping, we had the unit sent to an upcoming destination to make sure we didn’t miss it. Bob continued ordering more parts and doing more prep work to make the installation go as smoothly as possible. Meanwhile, the heat wave ended, and cooler temperatures returned, allowing us to spend more time in the trailer. You might also like When Things Go Wrong in RV Life.  The East is full of history, spanning the first American settlements to the Salem witch trials to the Revolutionary War to the Civil War. Having grown up in Massachusetts and majored in history education in college, Bob knows a lot about our country’s beginning. He introduced me to historical sites in his home state during my visits there in the early days of our relationship. I didn’t know a lot about the Civil War, though. I knew it was the bloodiest battle in American history and that it was fought between North and South about states’ rights, especially in regard to slavery, but not much more than that. We decided to explore some of the amazing landmarks that hearken back to Civil War days as we made our way up the East Coast, starting in Charleston, South Carolina. The state of Virginia played a pivotal role in the Civil War. In fact, the majority of battles took place there, at least four times as many as in any other state. The capital city of Richmond served as the capital of the Confederacy, only about 100 miles from Washington, D.C., the capital of the Union. Today, Virginia is known as the place for lovers, according to a popular slogan. Between 1861 and 1865, however, it was a place for combat. Although we didn’t visit any of the state’s battlefields, we did explore Gettysburg when we traveled through Pennsylvania in 2020. Looking Back Instead, we checked out the American Civil War Museum in downtown Richmond with friends Jim and Jenny. It’s an interesting spot shrouded by old brick facades that remained after the burning of the town during the war. The museum sits on the former site of Tredegar Iron Works, the supplier of half of the artillery to the Confederacy during wartime, and is only about 5 miles away from the White House of the Confederacy, which is also open for tours.  At the museum, we worked our way through various displays and interactive exhibits to learn about the area’s war history. The collection included letters from soldiers to home, creations by prisoners of war, information about slaves, the suit Jefferson Davis wore when he was captured by Union forces, and an authentic robe worn by a Ku Klux Klan member — with the face mask cut out of the hood. In addition, the museum featured a musket demonstration. A staff member in period uniform regaled us with stories about artillery and ammunition used during the war. He even loaded and shot a a long-barreled rifle. We jumped at the deafening pop and wrinkled our noses at the smell of smoke, getting a feel for the noise and chaos soldiers experienced standing side by side. Paying Respects After many hours at the museum, hunger pangs motivated us to leave in search of lunch. Jim and Jenny took us to a Mexican joint to fuel our bellies before heading to Hollywood Cemetery. A 90-foot-tall pyramid and numerous gravestones commemorate soldiers who gave their lives during the Civil War. The cemetery is also the permanent resting place of two U.S. presidents (James Monroe and John Tyler) in what’s called Presidents Circle. And it’s the burial site of six Virginia governors, two Supreme Court justices, Confederate General Jeb Stuart, and Confederate President Jefferson Davis.
The American Civil War Museum and Hollywood Cemetery are only two examples of the many ways to commemorate the Civil War. Plentiful others abound. We continue to brush up on our history as we make our way around this great country. You might also like Getting a Taste of History in Boston.  We had planned to navigate Gulliver to Charleston, South Carolina, with Tagalong in tow. But when the weather forecast called for rain, we decided to leave Tagalong behind in Virginia and rent a house in Charleston through Vrbo for five nights. We wanted to explore the city before boarding a cruise ship to the Bahamas. Charleston is a historical locale with varied architectural styles, delicious cuisine, and a beautiful waterfront offering plentiful activities. Friends Jim and Jenny climbed into Gulliver with us for a seven-hour ride that included a stop at our first Buc-ees, an overwhelming experience. Upon arrival at our destination, we found five memorable things to do in Charleston. 1. Tour a Military Ship or 2  Aircraft carrier USS Yorktown, a veteran of WWII and Vietnam, is proudly perched on the Cooper River in the heart of the city. Part of the Patriots Point Naval and Maritime Museum, she’s a beauty to behold. Wanting an up-close view, we paid about $30 each and spent five hours exploring the ins and outs of the ship. Four clearly marked tours allow visitors to guide themselves up and down the many ladders and through the narrow corridors where those who fought for our freedom walked and lived. We saw the engine room, bridge, catapult room, sick bay, brig, captain’s quarters, crew berths, galley, and much more. The ship features a collection of about 20 aircraft that span its flight deck and main deck, including an F-4 Phantom, an F-14 Tomcat, a Corsair, a TBM Avenger, and a B-25. In addition, the ship displays a replica of a space capsule in commemoration of the role it played in retrieving the astronauts and capsule from the Apollo 8 NASA mission. For those who want more to explore, the museum also includes a destroyer ship. USS Laffey is the most decorated WWII ship that still exists, according to the museum. Having visited the USS Alabama battleship in Mobile about a month earlier, we opted not to tour the destroyer. 2. Be Part of a Flag Raising  One of Charleston’s biggest claims to fame is Fort Sumter, where the first shots were fired in the Civil War. Visitors can take a 30-minute ferry ride for $37 per person from Patriots Point or from downtown to investigate what’s left of the fort. If you take the first ferry of the day from Liberty Square in downtown, you can participate in a flag-raising ceremony. We took advantage of that option on Memorial Day, boarded a three-deck boat, and found seats at the back of the top deck. En route with the wind in our faces, national park rangers and volunteers regaled us with historical details about the site.  After reaching it, we walked through a gated opening in the brick wall around the fort, got up close to cannons and what’s left of the brick walls, and toured a museum there. The best part was watching in amazement as a gigantic flag ascended a pole to fly proudly over the fort, an achievement that took about 30 to 40 volunteers. 3. Go on a Downtown Adventure  To get a closer look at the city’s architecture, you can participate in a self-led scavenger hunt. We purchased the Charleston adventure through Urban Adventure Quest for $49 and were not disappointed. Starting at the Four Corners of Law — a unique intersection that houses four buildings representing federal, state, city, and religious law — the quest led us through the city to various points of interest. We navigated to an 1800s bell tower, a couple of cemeteries, a museum displaying a replica of the H.L. Hunley submarine with a storied past, the waterfront, and Rainbow Row. We enjoyed learning about the history of the area while solving puzzles to find clues to our next destinations, a three-hour ordeal, including a stop for ice cream at Off Track. 4. Visit a Plantation  Charleston is home to more than 300 expansive plantations full of interesting artifacts. Bob, Jim, and Jenny toured the Boone Hall Plantation one morning while I worked. They returned with beautiful photos of foliage and loads of intriguing facts. One of the most interesting facts: For how much of an oak tree you see above ground, there’s an equal amount under the ground. Founded in 1861, this particular plantation provides a live presentation of the Gullah culture, a subgroup of African-Americans who live in the Lowcountry region of South Carolina and Georgia. Unlike most plantations, this one is still home to a resident and is a working farm. Guests can take a tractor tour around the 738 acres and go inside the plantation house. 5. Bring Out Your Inner Child  In the middle of a half-mile rotary in North Charleston sits the largest inclusive park in the world. Aptly named Park Circle Playground, it offers activities for all ages and abilities, including those with autism, sight and hearing impairments, and Down syndrome. It’s a safe space surrounded by a short fence, with rubbery ground and overhead shades. We spent probably an hour there trying out the various equipment, seesawing, swinging, “ziplining,” climbing a rock wall, and taking a stab at “American Ninja Warrior”-type training equipment. It’s an amazing place to visit. You might also like 7 Historical Things to Do in Virginia.  Our Jayco Pinnacle fifth wheel was built in 2018. Although online streaming had become popular by then, including a TV antenna on an RV roof was standard practice. We moved into our fifth wheel in April 2020 and never used the TV antenna, relying on streaming channels for our watching pleasure. For us, the antenna proved problematic, creating a contact point toward the front of our rig for low-hanging trees to easily grab and turn it. When that happened, the metal part of the unit faced sideways or forward, making it even easier to catch on leaves and branches. Bob had wanted to remove the RV TV antenna since we became full-time RVers. It led to some major issues, such as pulling our roof membrane out from under the rig’s nose cap — which resulted in roof leak issues later on — and leaning off our roof. Out with the Old After another roof rip while traveling from Mississippi to Georgia, Bob decided the time had come to do away with the antenna once and for all. He consulted YouTube to see what might be involved in the process. We already knew we’d have to remove the self-leveling caulk around the unit on the outside. But we didn’t know what needed to be done on the inside. The TV antenna controller was attached to our bedroom ceiling. When packing the rig for travel, we always checked to ensure the antenna faced the correct way. Bob removed three screws to disassemble the controller. An 8-inch or so PVC pipe dropped out of the ceiling. Climbing onto the roof of our rig, he painstakingly peeled away the caulk around the TV antenna, a blister-creating process. That revealed four screws holding the unit in place. After removing those, the antenna didn’t easily let go. It held securely in position.  Bob broke the seal around the unit and was able to separate it from our roof and disconnect the coaxial cable, exposing about a 3-inch hole that matched the one in the bedroom. With the unit out of place, he carefully removed the rest of the caulk, a necessary step before we could effectively cover the hole.  In with the New We had found some 0.032-inch aluminum at Lowe’s that we thought would work great to repair the new roof opening. Bob spray-painted it to keep it from getting overly hot on bright, sunny days. Then he cut it into two even pieces to ensure coverage of the screw holes left from the antenna. In the process of covering the hole, he managed to rip a new opening in the roof from his shoe rubbing on the membrane. Undeterred, he took off his shoes to avoid introducing additional holes and applied Eternabond tape, a staple on our rig, to hide the hole.  Bob positioned the first piece of aluminum and screwed it into place. Carefully matching up the seam with the other piece, he repeated the process. Then he spread new self-leveling caulk around all edges, making sure to cover the screws and middle seam. We’re relieved to be rid of the antenna from our roof. The topmost items on it now are two air conditioning units, conveniently located away from the roof’s edges.
You might also like Navigating Low-Clearance Bridges in an RV.  Can RVers stay at truck stops? We wondered this, as backing into or pulling through a parking spot designed for a semi-truck can feel cramped. We need at least 5 feet on the passenger side of our fifth wheel in order to open our stairs to get inside the rig to sleep. We’ve managed to do that at rest areas, but maybe their spots are wider.  We tend to avoid staying at busy truck stops. We don’t mind the low-pitched bub-bub-bub of the diesel engines, because the noise tends to be constant. But we don’t want to take a spot away from a trucker who might need it. We have great respect for truck drivers and what they put up with to keep our supply chain operational. We’ve overnighted at a couple of spacious truck stops, however. At one, we were able to park next to a telephone pole that prevented a truck from getting too close to us — and gave us plenty of space to easily get into and out of our rig. A roomy dirt lot across the street from another truck stop let us spread out and not feel cramped.  In both of these instances, we kept our truck connected to our trailer and boondocked. We felt safe, slept peacefully, and experienced nothing out of the ordinary. We were able to fuel our truck, open our dining room slideout to get to our living room, eat a meal, relax in front of the TV, start the next day with hot coffee, and get on the road to our destination in a timely fashion. A New Overnight Truck Stop Option Wanting to cater to more RVers, Love’s started installing RV sites at its easily accessible truck stops in 2022. They include Wi-Fi, electric and water hookups, and access to a dump station. Today, Love’s has 61 RV stops across the country. All spots are bookable and payable from a mobile device or an on-site kiosk. We had heard these could be pretty costly, so we didn’t think we’d ever take advantage of this option. But finding ourselves in need of a convenient overnight stop with electricity to power our air conditioners in the humid South, we decided to give a Love’s RV Stop a try while passing through Alabama.  Many Love’s RV Stops are fenced off, located away from the trucker parking, and somewhat private. The one we tried out included eight RV sites near the auto/RV fuel pumps. Getting into the spots in a setup like this can be tricky if the gas station is busy. Thankfully, we were able to back into our site just fine. It wasn’t level, but it was concrete. We fished out one of the boards we carry in the back of our truck. Bob drove forward, and I placed the board into position behind the tires on the low side of the trailer. He backed the rig onto the board and pretty well evened it out side to side. Because this was an overnight stop, we didn’t want to disconnect the truck from the trailer, even though Tagalong was about 3 inches high in the front.  This being a designated camping spot, we felt freer to leave our dining room slideout open, which gave us living space to enjoy while we recuperated from our drive for the day. Overall Experience The building on the premises included restrooms, showers, a store, and a couple of restaurants, which made for quick and easy meals after a busy day of travel. We were able to grab coffee in the morning before hitting the road, preventing us from dirtying dishes and adding water to our gray tank. On our way to moochdock at the home of some friends, we wanted our tanks empty. The constant movement of vehicles and people in and out of this location felt a little sketchy for our first foray into Love’s RV Stops. We kept our door locked whether we were inside or outside of our trailer. It helped that we parked directly under a light. Despite these seeming drawbacks, the convenience of the stop made it worthwhile for the $38 we paid. En route to our destination the following day, we stopped at another Love’s for fuel. It had a nicer RV setup, protected by a wooden fence and separate from truck parking and fuel pumps — for an additional $10. We had considered staying at it the night before, but that would have meant driving another hour and a half or so. We were grateful to save that time.  We would definitely consider trying another Love’s RV Stop when we need a convenient overnight stay on a long drive. It does offer a lot of pluses.
You might also like Our Favorite Phone Apps for RVing.  Narrow roads do not make for good parking situations with a fifth-wheel RV. They greatly limit our ability to maneuver the truck as needed on the far side of the road to get the trailer into position. When the space we’re trying to back into includes a ditch on either side, flanked by a tree, parking can be much more difficult. After multiple attempts to back from a narrow road into the driveway of our friends Jim and Jenny in Virginia, we decided to take a different tactic: driving front-first into the driveway and onto the yard to back into place from there. Finding a Way In It seemed like a good plan. Having just arrived from Georgia, we were unaware recent rain had softened the lawn. It didn’t help that the front yard sloped down, away from the driveway. Once on the lawn, we had to back the truck up an incline to push our 18,000-pound trailer into place, not an easy feat. Our truck is not equipped with four-wheel drive. Nor does it have Positraction (as mentioned in the movie “My Cousin Vinny”), which would allow us to engage both sets of dual tires at the same time. In essence, we were using only one side of the dually to push the heavy trailer up a grassy hill.  Bob attempted to back up the incline, but Gulliver’s tires only spun out. After getting our truck and RV stuck one other time in our five seasons on the road, we purchased heavy-duty tire traction boards (paid link*), like the ones you see hanging off the backs and sides of Jeeps. Feeling prepared for this type of situation, we fetched the tracks from the trailer’s basement and placed them behind the rear truck tires. Bob once again tried to back up the incline. The tires continued spinning out on the traction boards. We never anticipated that would happen. It seemed we were truly stuck.  Finding a Way Out We pay an annual fee to Coach-Net for RV roadside assistance. Not seeing an easy way out of our predicament (we couldn’t go forward due to trees), we consulted Coach-Net. The dispatcher put us in touch with a tow company. Although we felt out of place for about an hour, not wanting to go inside our home in its inclined state, we took solace in the fact that we had our friends’ home to wait in. A tow truck arrived from Mathews Towing and Recovery. After assessing the scene, the driver, Cody, determined the best way to correct the situation was to winch us out. He wrapped a winch cable around Tagalong’s rear bumper and gave Bob instructions to keep Gulliver’s transmission in neutral and to steer.  Cody added tension to the cable and started the winch procedure. The trailer moved slowly but consistently up the incline toward the driveway. Once Cody thought the RV was close enough, he had Bob put the truck in park, disconnected the cable from the trailer, and moved the tow truck to provide room for Tagalong on the driveway.  Mission Accomplished At this point, Cody gave Bob specific instructions on how to back the trailer the rest of the way out of the grass: slowly and steadily with even pressure on the gas pedal. And it worked! Bob was able to get Tagalong onto the driveway without hitting the garage. As I watched the tail of the trailer to make sure it cleared any obstacles, I managed to get a taste of what sinking sand must be like. My foot landed on what appeared to be hard ground, only to sink almost to the top of my shoe in Virginia mud. I’d have to deal with that later.  Cody stuck around as Bob moved the truck and trailer forward and back to ensure we got parked where we wanted, helping with guidance all the way. Cody even stayed around after, sharing valuable tips and tricks to help us avoid a situation like this in the future. His biggest piece of advice: Get tire chains. “They’re not just for snow,” he said. You might also like How a Flat Tire Helped Us Work Together. * As Amazon associates, we earn from qualifying purchases.   A tornado watch went into effect in Georgia where we were staying. A few hours later, the tornado watch had been downgraded to a severe thunderstorm warning, with 70 mph wind gusts and pingpong-ball-size hail predicted to hit our area in 15 to 30 minutes. Bob rushed around to close all four trailer slideouts while I stayed in communication from Las Vegas, where I had been sent on a business trip. With the slides closed, Bob moved inside the home of our hosts, Greg and Sharon, thankful he didn’t have to stay in the trailer for the onslaught. As Bob and I texted, lightning literally hit the property with a loud BOOM! at just past 11 p.m. Peering out the windows to see if anything had caught fire, Bob didn’t notice any brightness in the dark sky, other than more lightning. Lights Out The sonic boom from the thunder clap had caused Gulliver’s alarm to sound, waking Greg and Sharon. Bob didn’t hear it in the basement, and by the time he ascended the stairs, the alarm had grown silent. Instead, the three heard squealing. Further investigation led them to Greg’s uninterruptible power supply (UPS), which protects his TV. It must have taken a surge. Greg reset his UPS and was pleased to discover his TV hadn’t been harmed. The darkness of the night and the nastiness of the weather prevented the threesome from going outside to check on any damage around the house. They did, however, notice that the internet was out. A look at the house circuit panel revealed four or five of the breakers had been tripped. Greg flipped them back on, restoring power. The outlet powering our trailer had been protected from a ground fault interrupt (GFI) by another outlet in the garage. But the GFI outlet had been fried, leaving Tagalong dark and without our normal Starlink satellite internet. Our fallback cellular internet that runs off our batteries still worked. Bob and Greg replaced the faulty GFI outlet with an extra one Greg had on hand. That fix gave Tagalong shore power and satellite internet again. We both breathed a sigh of relief that the trailer shore power didn’t sustain damage. With another storm forecast to hit the area at 6 a.m., Bob decided to grab his pillow from the trailer and sleep in Greg and Sharon’s basement that night. Morning Dawns The light of day revealed why the thunder had sounded so loud. Lightning had struck two trees about 30 feet from the house. Upon closer assessment, Bob, Greg, and Sharon realized the lightning bolt had run down the outside of both trees.  It must have followed the tree roots underground and boiled some water too, because they found a crack on a deck post and a buckled slat on the deck floor. A potted fern had been sitting on a ceramic plate atop the affected post. The plate had shattered, the pot lay on the ground, and the plant rested outside the pot. In addition to all that, a drain pipe had split and blown apart. 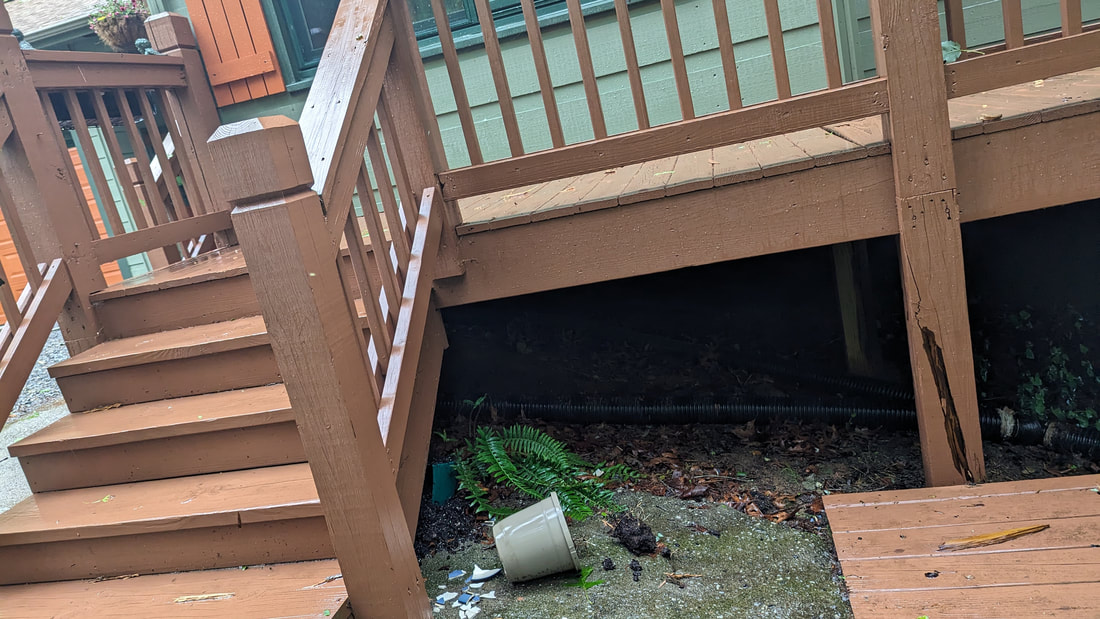 The threesome surmised the lightning traveled from the corner of the house up through the electrical ground wire into the circuit breaker box, causing the electrical problems.
Greg and Sharon didn’t have internet service for a few days. We were glad to be able to share our Starlink internet with them. They continued to find other electrical issues — multiple fried GFIs, Wi-Fi routers, Bose sound system, and the main cable feed from the street to the house — demonstrating how powerful a bolt of lightning can be. I thank God for keeping the three of them safe. You might also like Awakened by a Tornado Warning. |
AuthorThis is the travel blog of full-time RVers Bob and Lana Gates and our truck, Gulliver, and fifth wheel, Tagalong. Categories
All
Archives
July 2024
|


 RSS Feed