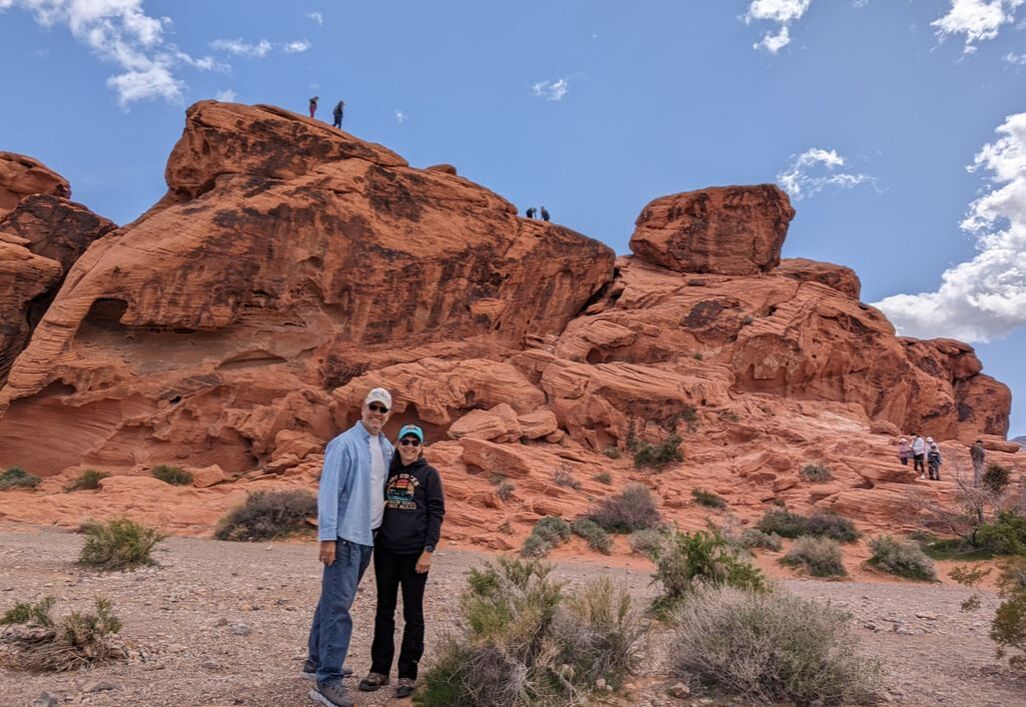
 We were looking for a place to boondock near Las Vegas to start our ascent north. We found what looked to be a great spot: Valley of Fire West Dispersed Camping, a swath of Bureau of Land Management (BLM) land known to have unofficial campsites (areas to pull off a dirt road and set up camp). When we told the boondocking community we were with at the time about our plans, they informed us Valley of Fire was a beautiful state park worth investigating. If not for their report, we may have never discovered this hidden gem, and we would have missed a breathtaking excursion. Surrounded by Red Rocks Other than red rock formations, we didn’t know what to expect as we drove 5 miles from our dispersed campsite toward the western park entrance. As we rounded the last bend before the payment booth, red rocks came into view. 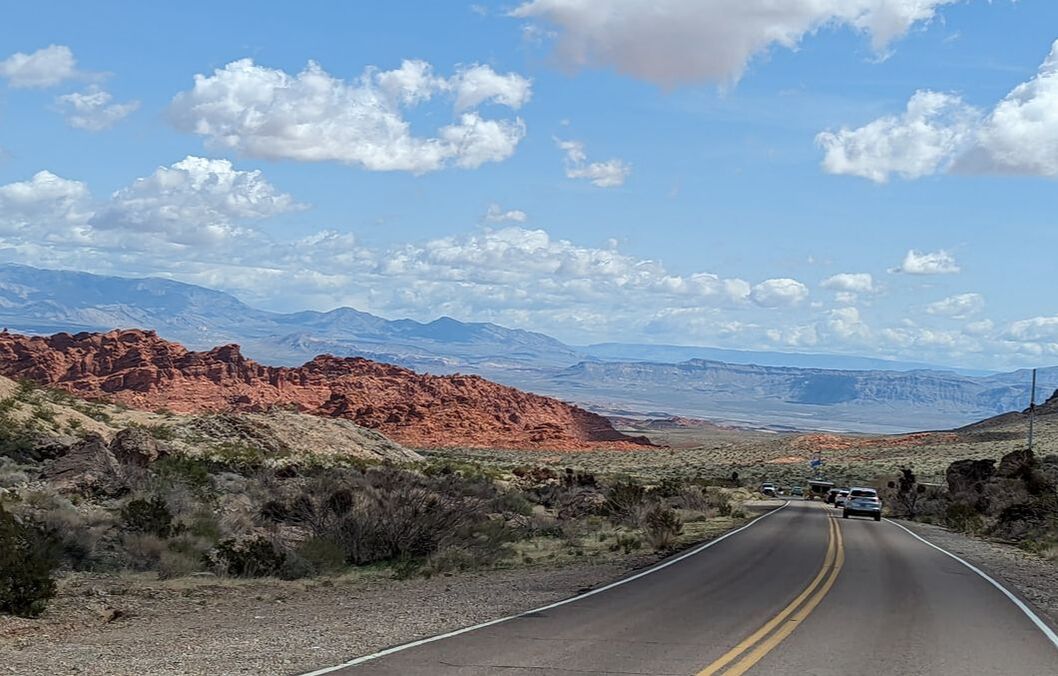 In exchange for a $15 nonresident fee, a park ranger handed us a receipt and a brochure. Off we went down the 7-mile Valley of Fire Road through the park, stopping at the first parking lot we came to: Beehives. Beehive-shaped rock formations mesmerized us. We climbed a little, snapped some photos, and found ourselves in awe. And this was only the beginning. 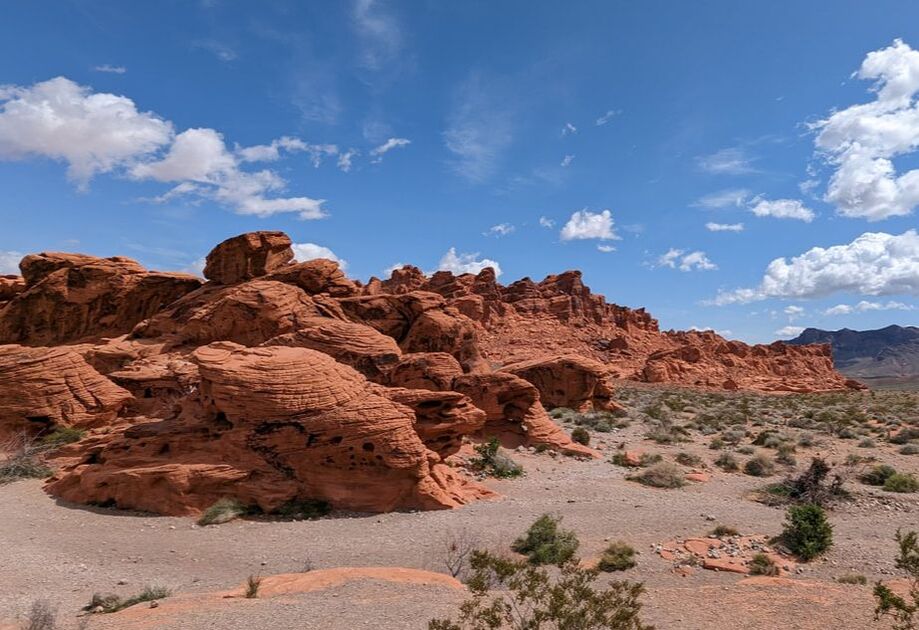 We continued on, the red rocks becoming more plentiful. We turned off the main road to check out the campgrounds and see what we were missing. We had considered staying in the park for up to a week once we learned about that option. The $35 nightly fee for out-of-staters was reasonable, but reviews we read talked about the challenges of getting a spot on a first-come, first-served basis. Surrounded by picturesque flaming beauty, the campgrounds are nice. One felt a little more cramped than the other due to the towering rock formations surrounding it. Seeing the established campsites made us appreciate the vastness of our boondocking spot and confirmed we had made the right decision. 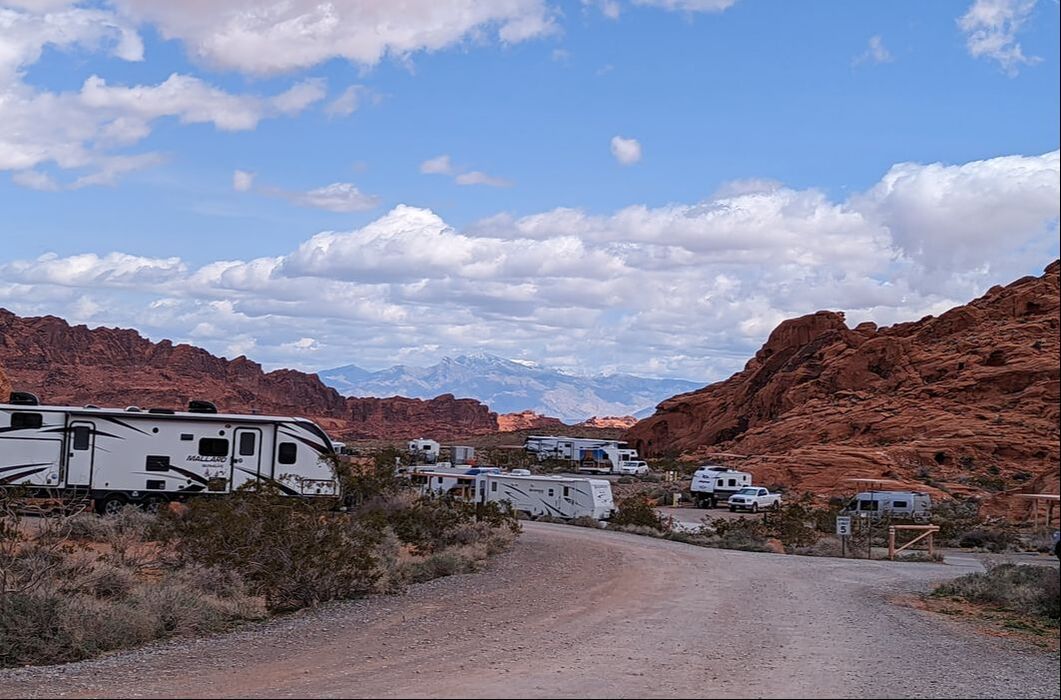 Colorful Panorama Back on the main road, we passed the Visitor Center and climbed out of a valley between red rocks on the aptly named Scenic Drive. We parked at a spot called Rainbow Vista and embarked on foot on a 1-mile, round-trip trail to a canyon overlook. Rainbow Vista is a fitting name for this area, as it offers panoramic views of vibrant color contrasts: reds, tans, greens, blues, and yellows against a clear blue sky dotted with puffy white clouds. As we traipsed through the red sand and over rocks, we couldn’t help but marvel at God’s beautiful creation all around us. 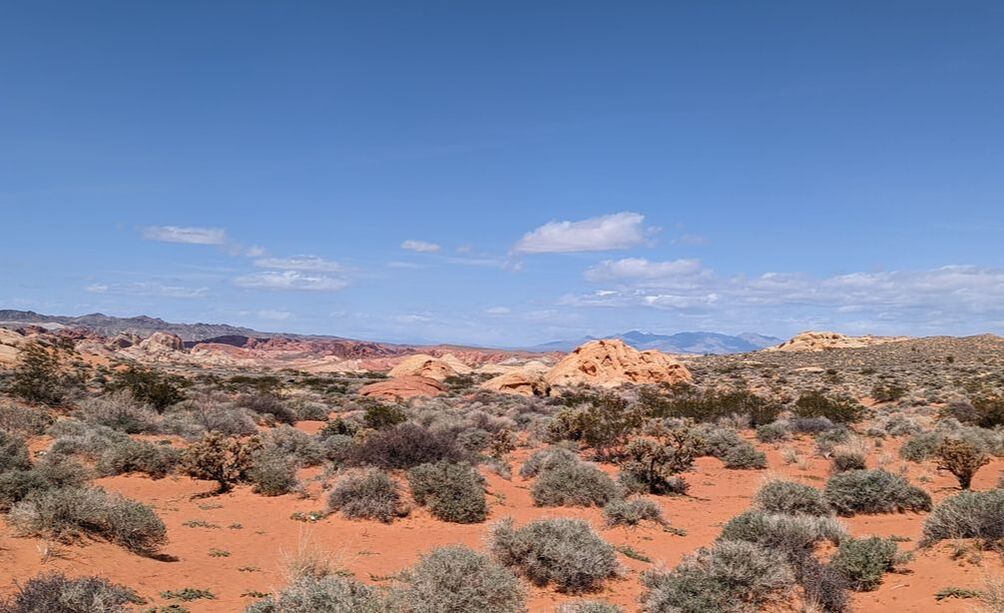 After rehydrating, we continued on Scenic Drive as the red rocks transitioned to white domes and pinks and pastels. We got out again for a short jaunt at the Pink/Pastel Canyon before heading back down to Valley of Fire Road and the Visitor Center. 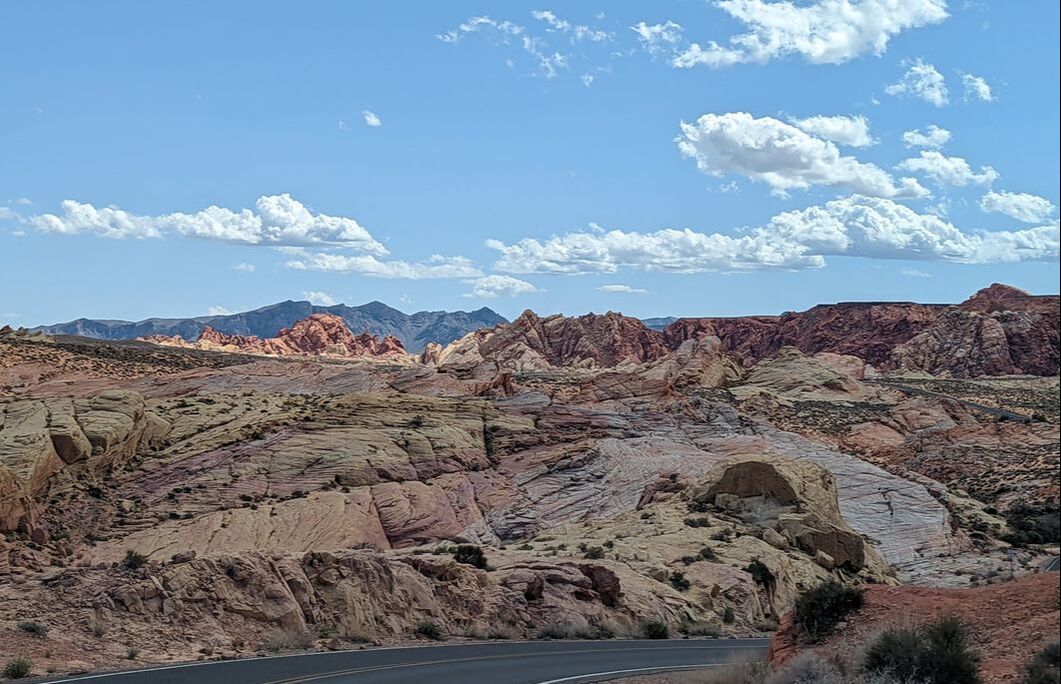 A History Lesson Inside the Visitor Center, we found a museum complete with descriptions of the different types of rocks in the area, the history of the peoples who had lived in the region, a collection of arrowheads and other artifacts and, of course, a gift shop. We learned the majority of the formations we saw were Aztec sandstone. The lighter colors were limestone. The concrete-looking rocks were conglomerate. We also discovered Valley of Fire was Nevada’s first state park. It opened in 1934, but the road through it dates back to 1912, when it was created to connect Salt Lake City and Los Angeles. My favorite part of the museum was learning about the people who had lived in the area and how they had survived and thrived. I even saw a remnant pair of handwoven sandals made from plants. Bob enjoyed learning about the variety of rocks. Treasure in the Wasteland Back in Gulliver, we decided to continue on Valley of Fire Road and exit on the east side, near Lake Mead. The scenic drive took us past seven natural pillars, a formation named Seven Sisters. It also led us to Elephant Rock. We parked there and hiked a little over a mile to see the structure bearing the name. 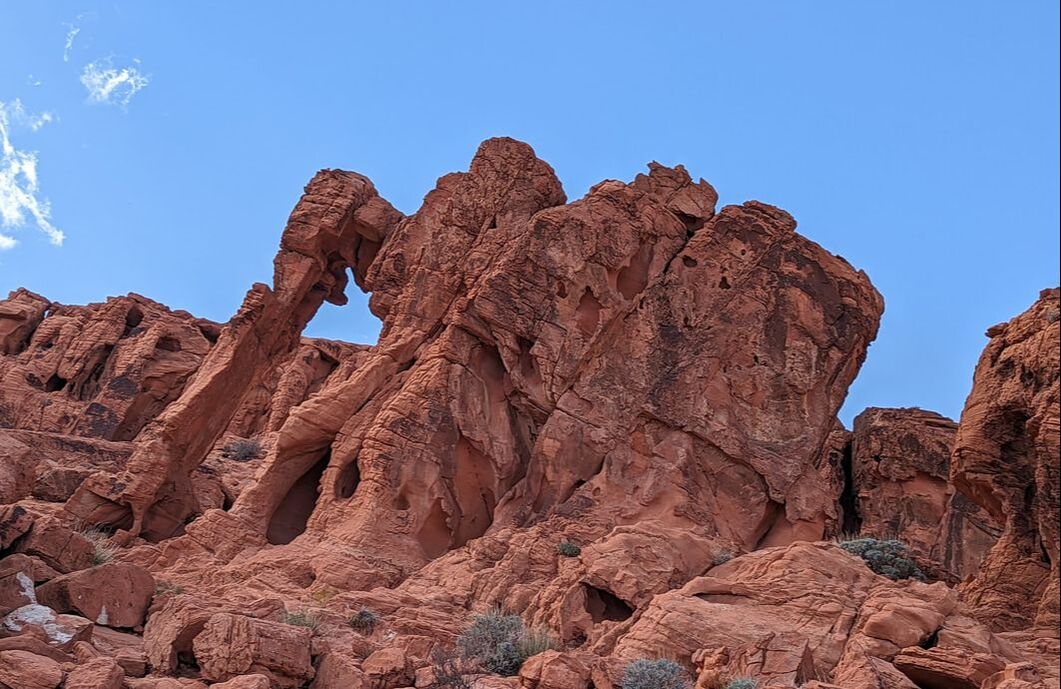 Once we exited the park, I kept looking to my left, amazed at the lack of red rocks. A few formations hinted at the beauty behind them, confirming that Valley of Fire is indeed a hidden gem. It truly is worth seeing up close and personal, as pictures don’t do it justice.
You might also like Magnificent Rock Formations.
9 Comments
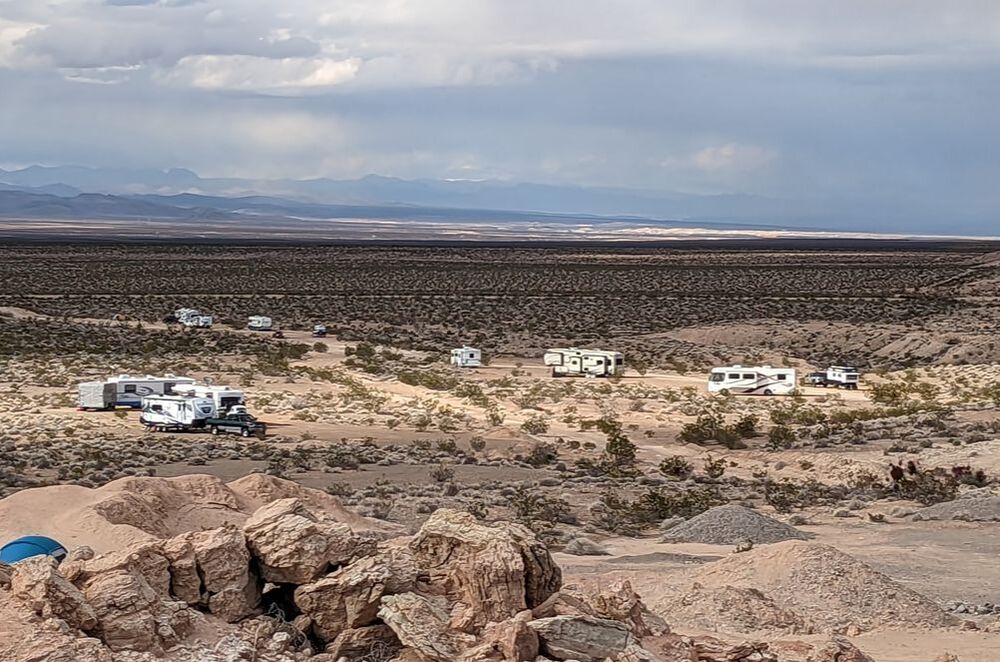 We’re no strangers to boondocking, or camping off the grid (without water, electric, or sewer connections). We first experimented with it when we had a travel trailer and found ourselves amazed at how remote and isolated we could be not too far outside a city. The appeal of this freedom continues to attract us. Sure, campgrounds have their allure too: electricity, running water, and security, just to name a few. Although boondocking doesn’t include those things, it does have a lot of benefits. Let’s look at some of the pros and cons of boondocking. Pro 1: Beautiful Views Camping off the grid means we’re not constrained by campground setups and property boundaries. We can get up close with nature and park in such a way that our windows overlook magnificent scenes of God’s beautiful creation. 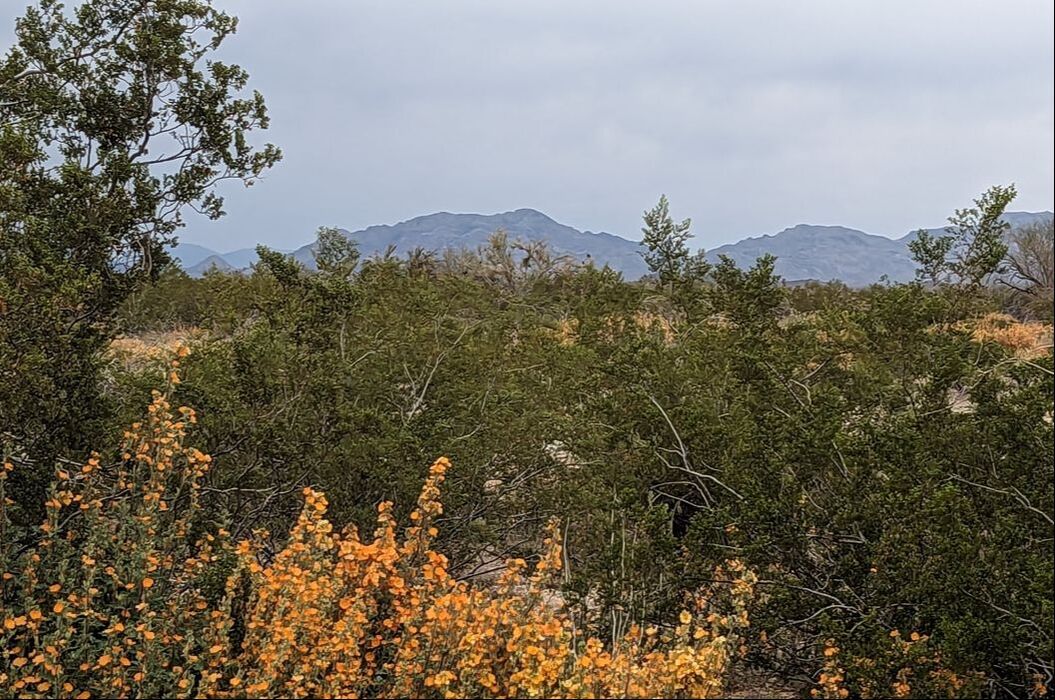 No, we can’t camp just anywhere, but boondocking does give us a lot of flexibility. Bureau of Land Management (BLM) land offers some of the best boondocking. This land is much more prevalent in the West than it is in the East. If we want to get out of high temperatures and into cooler country, we can camp in forested areas with high altitudes. If we find mountain camping is too cold at a certain time of year, we can relocate to deserts with picturesque panoramas. The views aren’t limited to the horizon. Being away from city lights also gives us incredible shows in the night sky. One night while boondocking, our refrigerator started beeping to alert us our propane tank had run dry. We exited the rig to change the tank and were treated to an awe-inspiring scene of the stars come to life. I had never seen that many stars. Pro 2: Quiet Serenity Most boondocking spots offer solitude and quiet. I say most because some areas are popular with ATVers, motorbikers, and other outdoor toy enthusiasts. Such areas can be quite noisy, as can locations near shooting ranges. When not in those unpleasant environments, boondocking can feel a lot like old-school camping. Because we don’t have electric hookups, we typically watch less TV. Instead, we read, play games, and get out in nature. We find ourselves thinking about what it must have been like for early settlers in America. Boondocking allows us to spread out from other campers as space tends to be plentiful. We enjoy wider, airier setups than we find at most campgrounds. 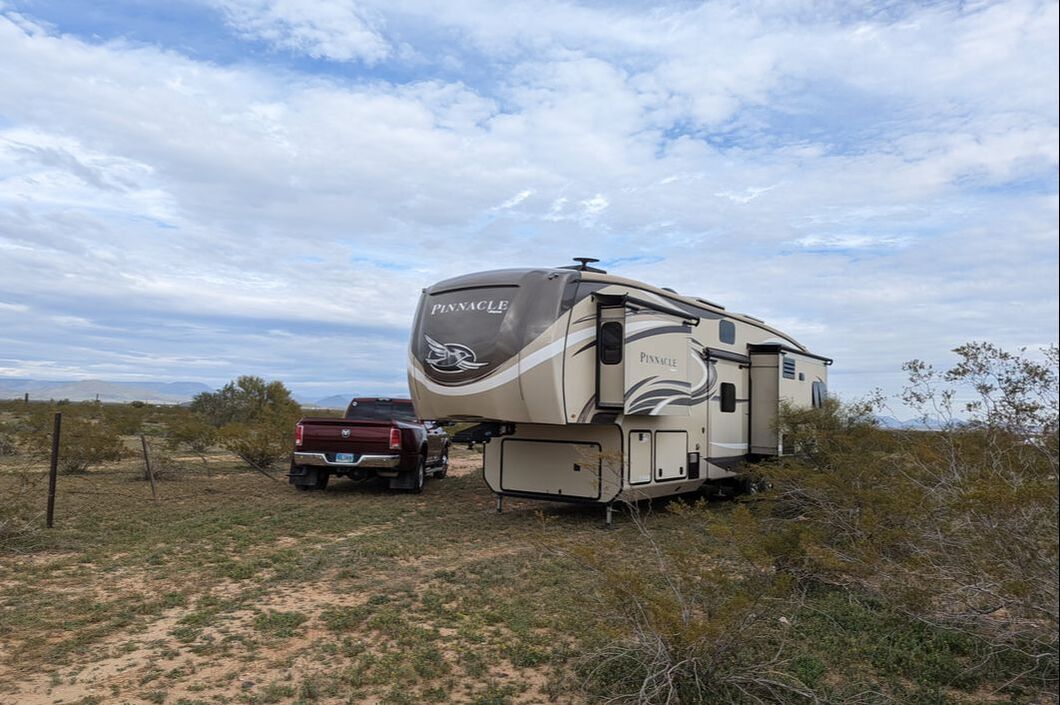 Pro 3: Economical Cost Boondocking locations are often free for up to a 14-day stay. Others require a permit for around $20 for that length of time. That means we can save quite a bit of money while camping in close proximity to, and exploring, national and state parks and other attractions. We did have to make an initial investment in some big-ticket items to be able to take advantage of this type of camping, though. Without electricity, another method is required to charge RV batteries. We invested in six solar panels that we installed on our roof. We carry an additional two panels in a solar suitcase, plus two generators that Bob converted to run on propane. That way, we don’t have to have gasoline for a single purpose since our truck runs on diesel. 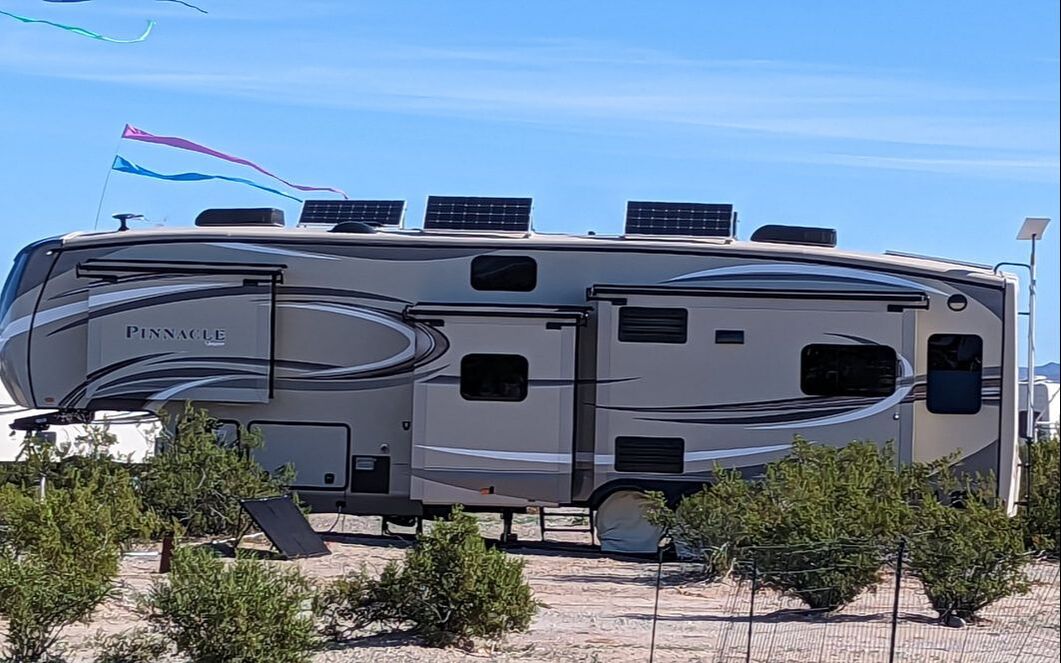 Our rig came equipped with a 75-gallon freshwater tank, 50-gallon black water tank, and 85-gallon gray water tank. We just have to plan ahead to ensure we have empty wastewater tanks, plenty of freshwater, and a stocked refrigerator and pantry before embarking on a boondocking adventure. Established campgrounds for dispersed camping (a fancy term for boondocking) may charge a small daily fee for maintenance. We stayed at one such location that charged about $10 a day, but it provided the perks of running water a couple of hours a day, a trash dumpster, and the freedom to empty our gray tank water into nature. For an additional $5 per-use fee, we could get our black tank emptied from a honeypot truck. 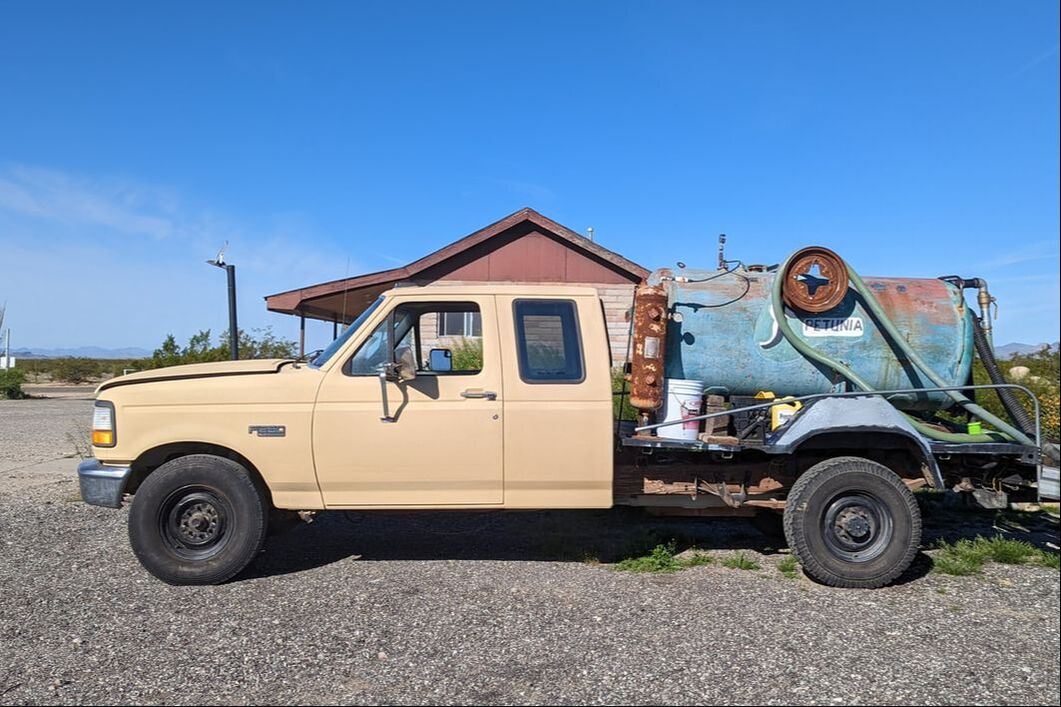 Perks like those are not the norm when boondocking. Most of the time, we’re on our own.
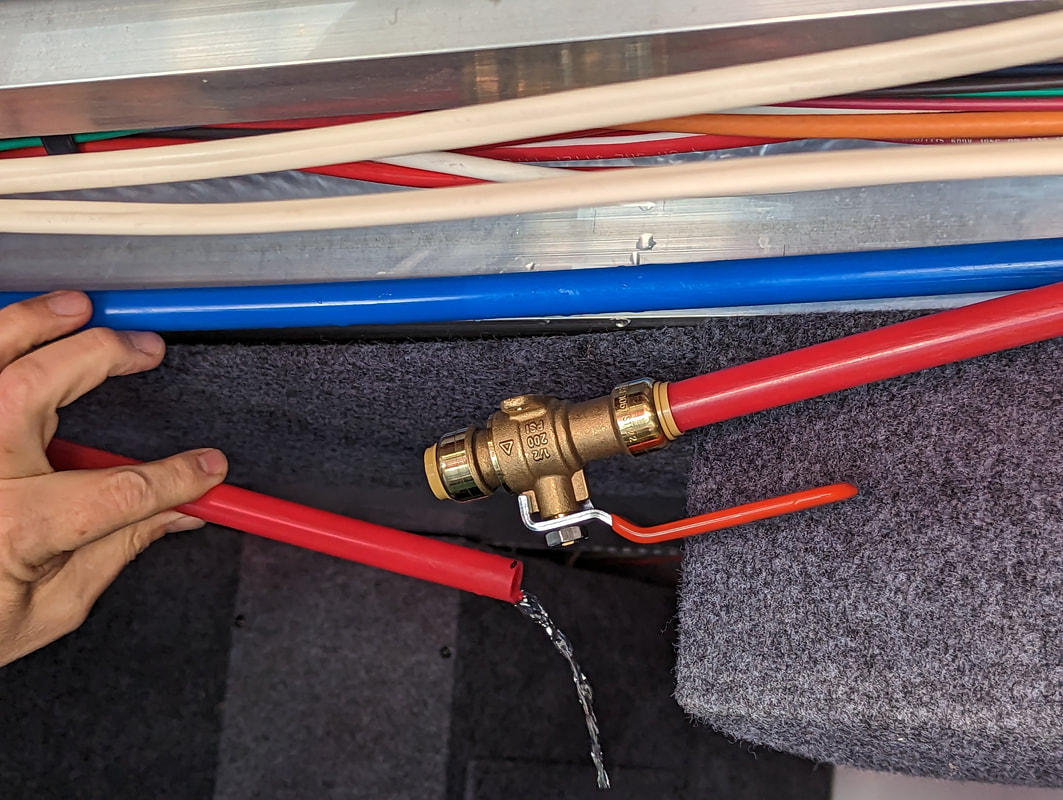
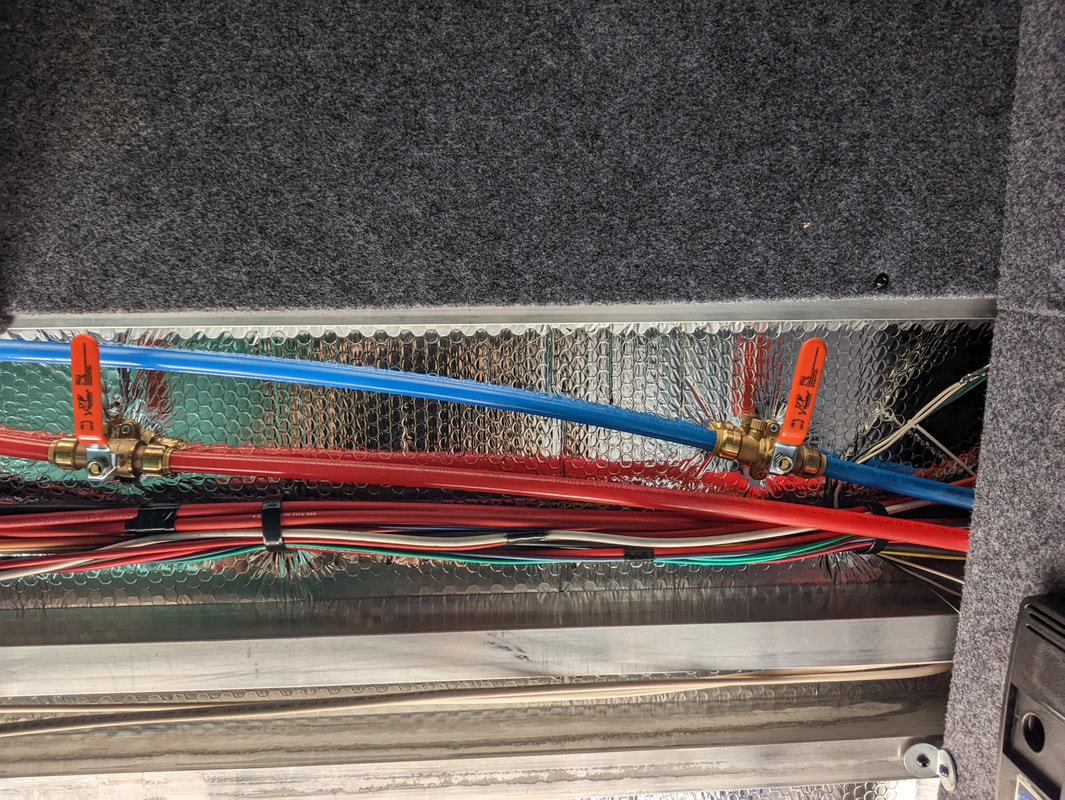
Con 1: No Trash Pickup Cooking in any form tends to produce waste of some sort. Unlike campgrounds, boondocking locations don’t offer dumpsters for campers’ convenience. We’re required to pack out our trash. We’ve learned to use small plastic grocery bags for trash when boondocking because they’re easier to get rid of than a tall kitchen trash bag. Small bags fit better in a grocery store or gas station trash bin. This practice also makes it easier to divvy up our trash into numerous waste cans rather than trying to stuff it all into one. Con 2: Limited Water Supply & Wastewater Capacity We have to be mindful of the capacity of our freshwater and wastewater tanks while boondocking to ensure the first doesn’t empty and the latter doesn’t fill. If we run out of freshwater, we have to find a place that offers more and transport it to our location to replenish our tank. If we fill our waste tanks, we have to hook up Gulliver to Tagalong and head to the nearest dump station to get rid of the contents. That means no long showers with running water in between lather and rinse, which we don’t tend to do anyway. It also means only washing dishes once a day. Using paper plates instead of reusable dishes may equate to running less water, but it creates more trash. Con 3: Dust Collecting dust is pretty much a given when boondocking. Camping in the dirt lends itself to, well, dirt. Most boondocking locations are wide-open areas, which are prone to wind — that exacerbates the dust issue. Of course, wind isn’t isolated to boondocking spots. We’ve encountered plenty of blustery weather at established campgrounds as well, but it does seem to be more prevalent while boondocking — at least in our experience. The pros of boondocking far outweigh the cons, in our opinion. We’re thankful for the beautiful views, quiet serenity, and economical cost and will continue to take advantage of these camping opportunities. You might also like Busted While Boondocking. 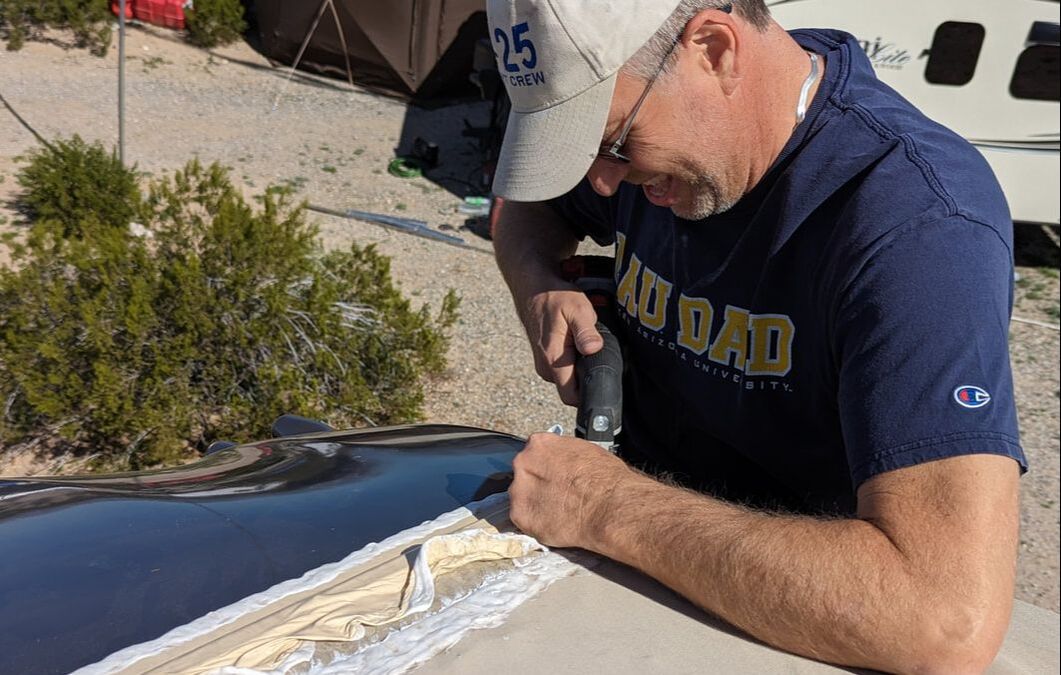 We never expected to spend our first three days back on the road on our roof, but there we were. The wind blowing against the front of our rig as we traveled down the highway made our slack rubber roof membrane flap, pulling open the Eternabond tape at the leaky seam we had sealed. More than likely, that seam had already been compromised by trapped moisture between the first and second repair jobs. Having met up with full-time RVer brother Tom to boondock in the desert, Bob ascended the ladder to the roof to adjust our solar panels so they could receive maximum sunlight throughout the day to charge our batteries. If he hadn’t, we likely wouldn’t have known about the roof issue — until we had another rain-produced leak. (We’ve since added a roof check to our disconnecting the trailer from the truck checklist.) 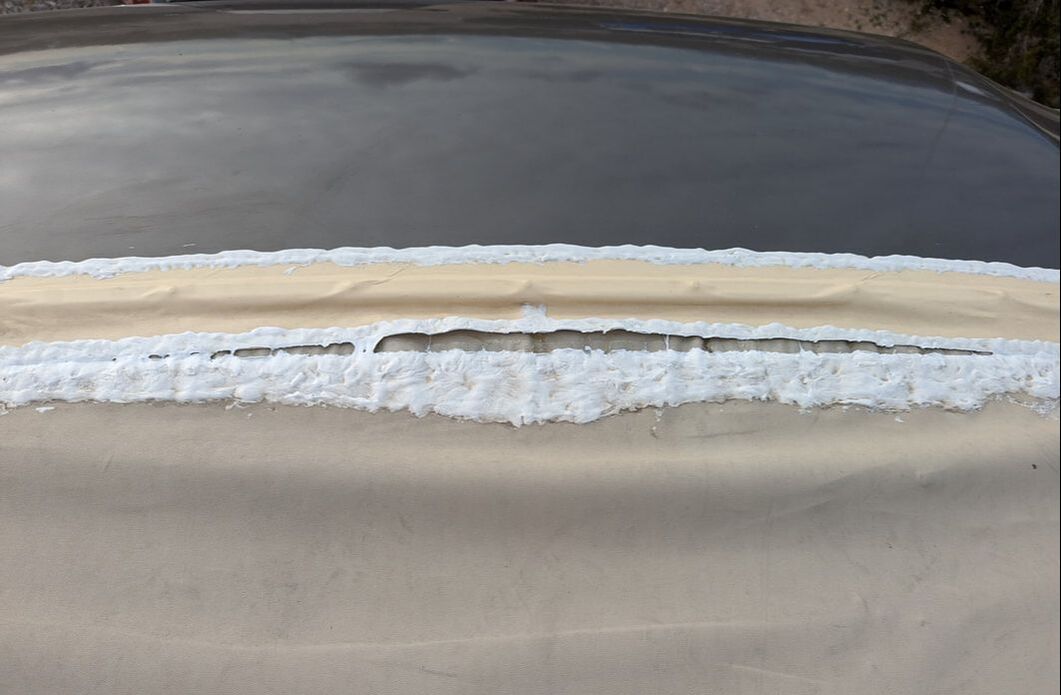 To the Rescue Unpleasantly aware of the problem, we knew we needed to address it right away, before any rain came our way. Our boondocking neighbor turned out to be a godsend. Doug is a roof pro who specializes in solar panel installations. Although our solar panels didn’t need attention, his expertise lent itself well to our situation. He recommended peeling away the tape and caulk from our last repair job, removing the trim piece that seals the nose cap to the rubber membrane, and pulling the fabric taut under the cap before resealing the trim piece in place. That’s one thing we hadn’t done before: remove the trim. Maybe that was the missing link. Once again, we climbed onto the roof and started tearing apart the Eternabond tape and Dicor self-leveling sealant we had put in place two months earlier. This time, though, we had an oscillating tool that made light work of the job — and saved our fingers from blisters. Thanks, Tom! 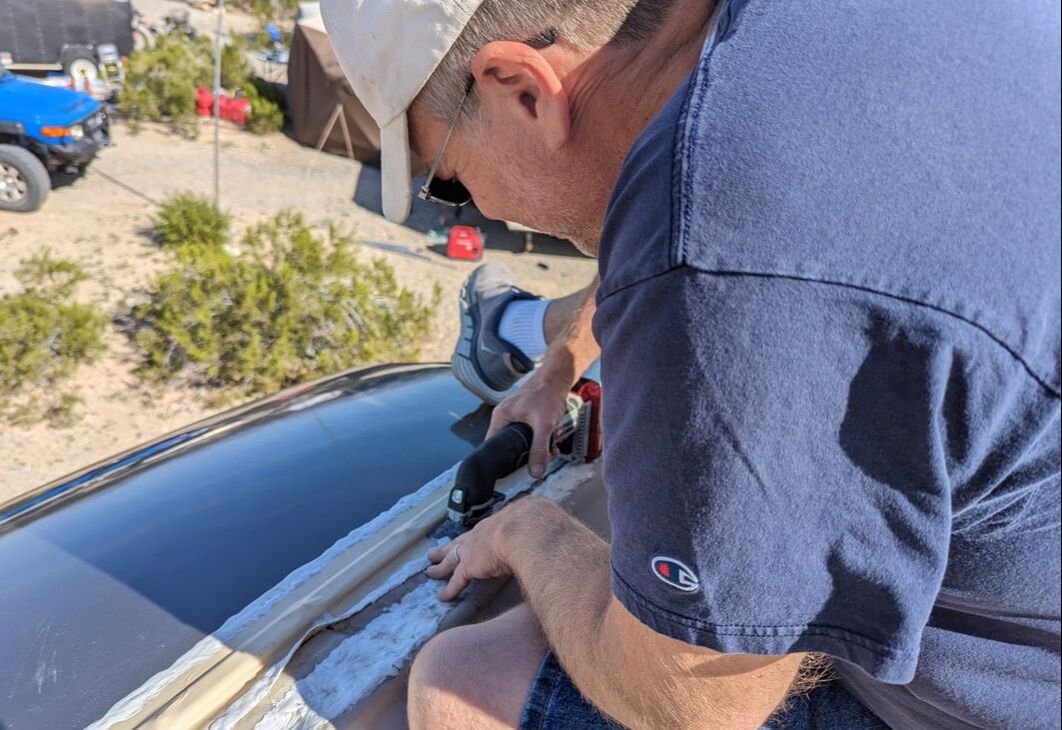 We succeeded in removing the old tape and sealant. Although we were eager to repair the issue, 15 to 17 mph headwinds prevented us from doing so. We didn’t want to remove the trim piece only to have the wind get a hold of the membrane and make matters worse. We had to wait for the wind to die down. Slow-Going The next morning, we ascended the ladder to the roof, removed the screws holding the trim piece in place, and cleaned off the silicone clinging to the trim. Because the sun hadn’t risen very high to warm the air, the rubber roof membrane had no slack. As a result, we couldn’t pull it taut under the nose cap. 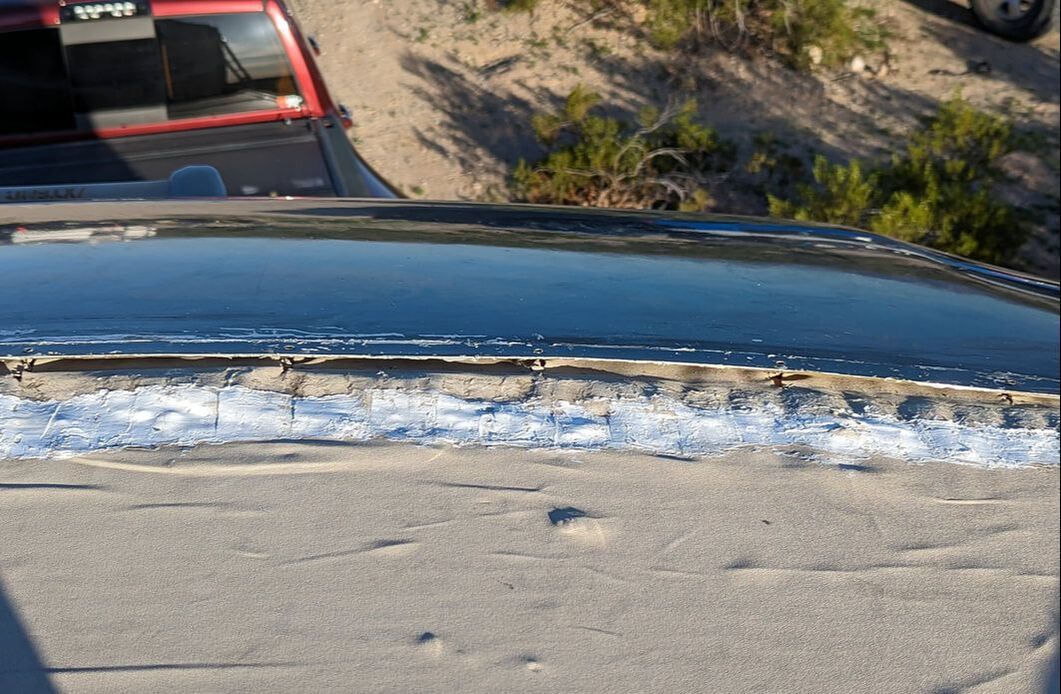 Our window of opportunity to replace the trim piece before the wind picked up quickly shrunk. Needing the weather to cooperate, we were reminded of Proverbs 19:21, which says, “Many are the plans in a man’s heart, but it is the Lord’s purpose that prevails.” During our break, I went back to work, and Bob did prep work for the repair job. That involved completely eliminating any remaining silicone from the trim piece, adding waterproof butyl tape to its underside, and cleaning the seam area to accept new sealant. The break also gave Bob an opportunity to consult with Doug about the best way to move forward. Bob readied himself to head into town to get an aluminum slat to secure on the roof directly behind the trim to prevent any remaining slack fabric from pulling open the seam again. Mission Complete Doug happened to have a 3-inch-wide piece and offered to cut it to the size we needed. We gladly paid for that convenience. (Did I mention Doug was a godsend?) Bob drilled pilot holes in the piece and sanded down the corners to prevent them from ripping new holes in the roof. Back on top of the trailer, we pulled the rubber membrane as taut as we could, unable to get it back to its original spot. We did the best we could and secured the trim piece, followed by the aluminum slat — instead of Eternabond tape. The aluminum would prevent any flapping fabric from ripping apart at the seam. 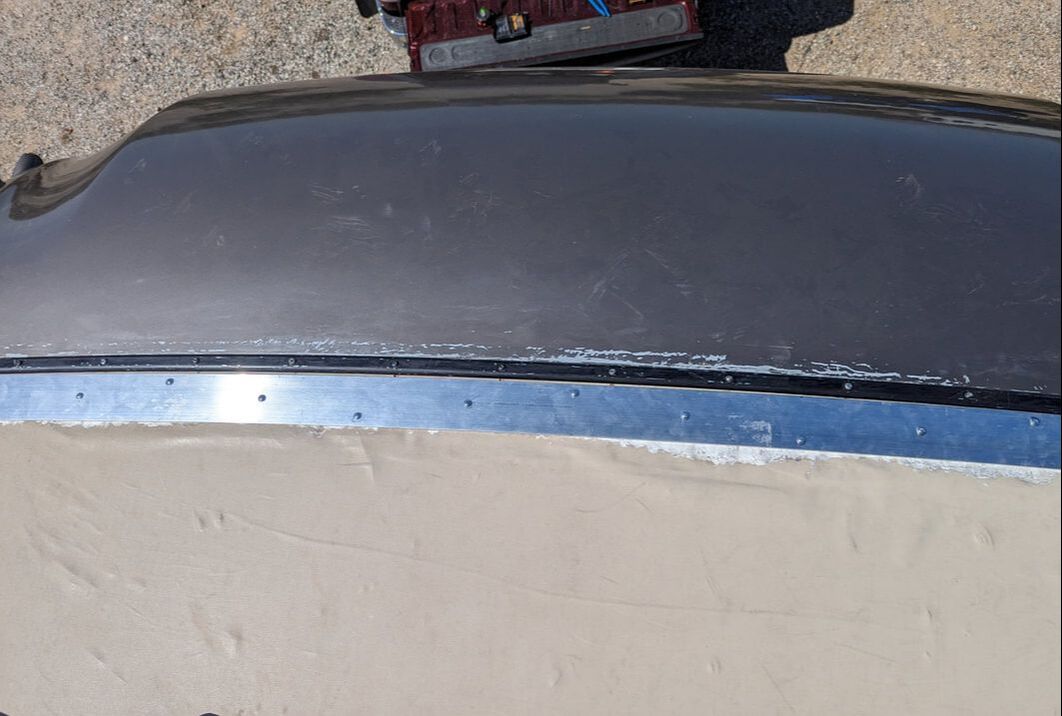 Bob resealed all around the trim and aluminum with Dicor self-leveling sealant to keep rain from finding its way into our rig. Just as the “third time’s the charm” saying proved true in fixing the water problems that plagued us for months, we’re hopeful it will be true of our roof repair. Time will tell. You might also like Attack of the Killer Cardinal. 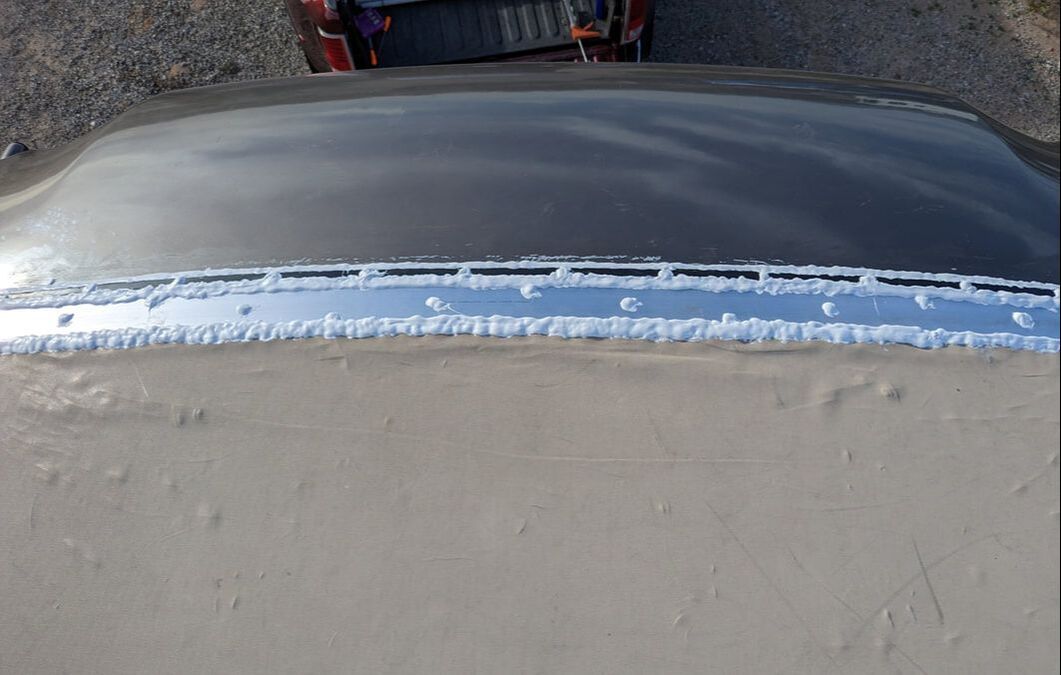  After many weeks of daily shammy wringing to eliminate water that had been collecting at the front of our fifth wheel in a very difficult-to-get-to area, I had had enough. With travel right around the corner, I considered calling a mobile RV tech, but I didn’t want to look foolish — like the time we called an RV tech to fix a leaky gray wastewater tank valve, only to learn we had two gray tanks. Desperate Times, Desperate Measures I decided to take things into my own hands to see what I could see. Ascending our adjustable ladder at its shortest configuration, I crammed myself into the bunklike top storage compartment at the front of our rig and maneuvered into a sitting position, my feet dangling. (So much for not looking foolish.) A thick layer of (mostly) puffy fiberglass insulation blocked my view. I couldn’t even see past the flatter insulation, the fibers of which had been broken down by water steadily seeping through it. Not willing to deal with any more water torture, I determined to get a better look. Clad in long sleeves, gloves, and an N-95 mask, I engaged our trusty channel-lock pliers to grab the cotton candy-like substance and remove it. A metal beam forming the floor of our bedroom prevented me from sticking my hands in very far to get to the stuff. Able to grab only a small portion at a time, the pliers made for a slow removal process. Taking a break, I noticed a full edge of insulation sticking out on the left side. I grabbed hold of it and, sure enough, was able to pull out a whole chunk — and then another chunk. 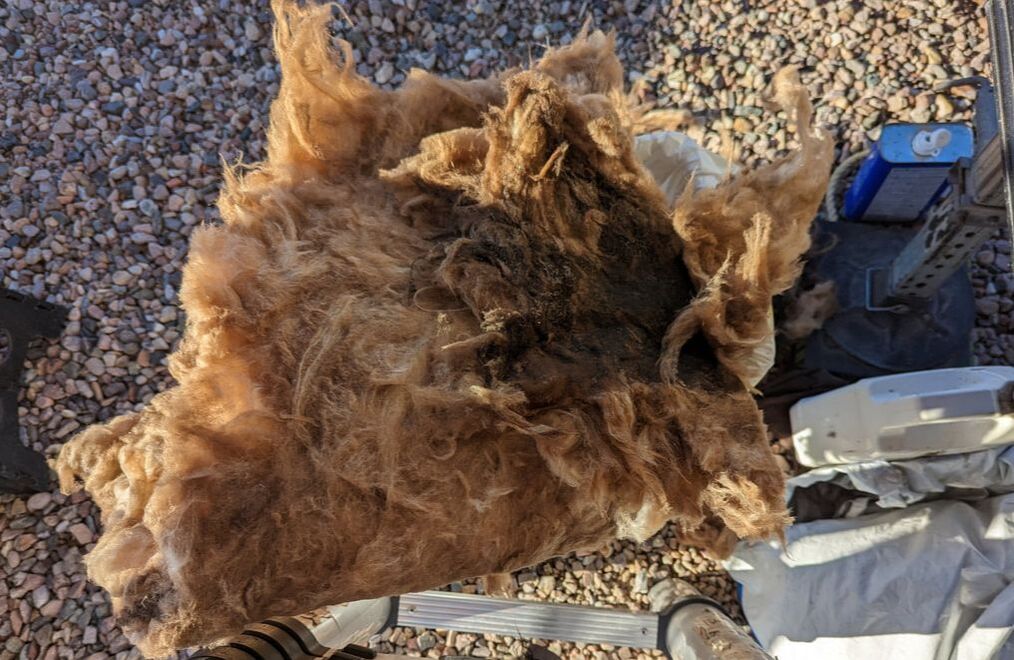 This left the most compromised portion due to water damage. Little by little, piece by piece, opening and closing the pliers, I yanked it all out. I finally had complete visibility of the plywood forming the compartment ceiling. Finding the Culprit Shining a flashlight across the exposed plywood revealed a clue as to the root of the problem. The passenger side of the compartment clearly showed water spots. I pried myself out of the bay, eager to tell Bob of my findings. 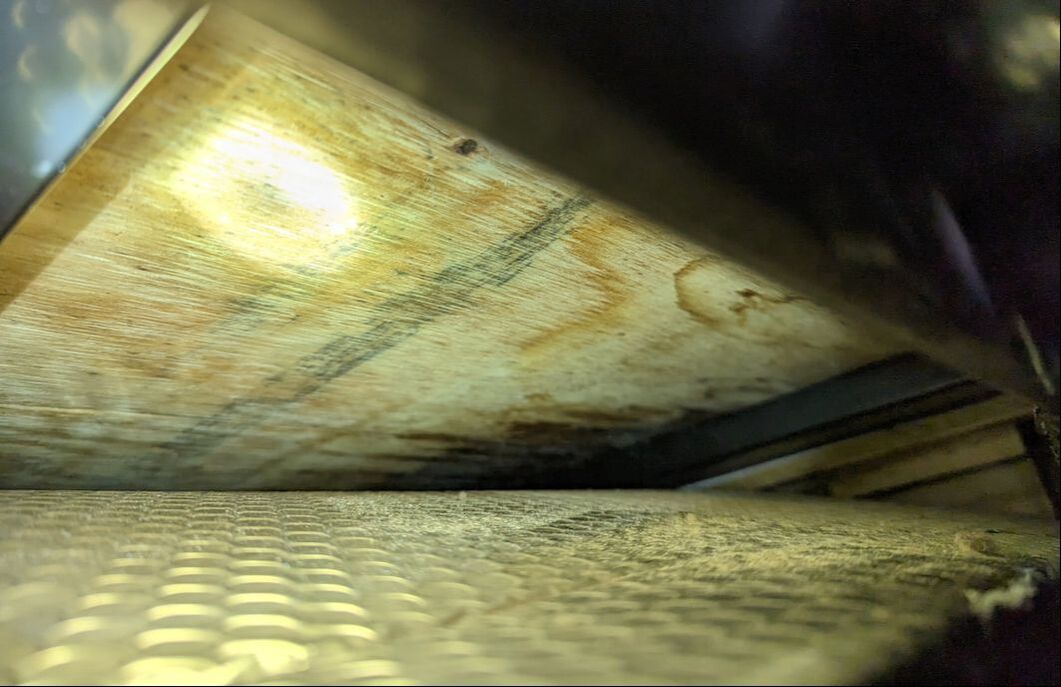 As it turns out, red and blue PEX pipes run along that side of the rig from our basement to the washing machine hookups in the bedroom. Opting to forgo an onboard washer and dryer leaves water in those pipes with nowhere to go. We had checked the pipes on more than one occasion. They looked fine and showed no signs of leakage. Yet, every indication pointed to them being the issue. With the sun dipping close to the horizon, I stuffed shammies between the front compartment’s plywood and silver bubble wrap floor to catch any remaining water drops. We headed to The Home Depot to get some shutoff valves for the cold and hot water pipes leading to the laundry hookups. We should have listened to fellow full-time RVer friend Alan when he had suggested that. A Long-Term Solution The next morning, much to my delight, I opened the front compartment and found absolutely no water — for the first time in numerous weeks. This confirmed our theory that the insulation had been slowly wicking away the moisture. We decided to install the valves anyway from our basement as a safety measure. With the city water to the trailer turned off, Bob drained any remaining liquid from the pipes, cut and secured them to the valves, and attached the valves to the rig so that they wouldn’t dislodge the lightweight PEX when Gulliver pulled Tagalong down the road. If it weren’t for the original roof leak that had alerted us to a problem, we may have never known about this slow drip. We’re thankful to truly be above water once again.
You might also like Gulliver Gets a Tow. |
AuthorThis is the travel blog of full-time RVers Bob and Lana Gates and our truck, Gulliver, and fifth wheel, Tagalong. Categories
All
Archives
July 2024
|
 RSS Feed