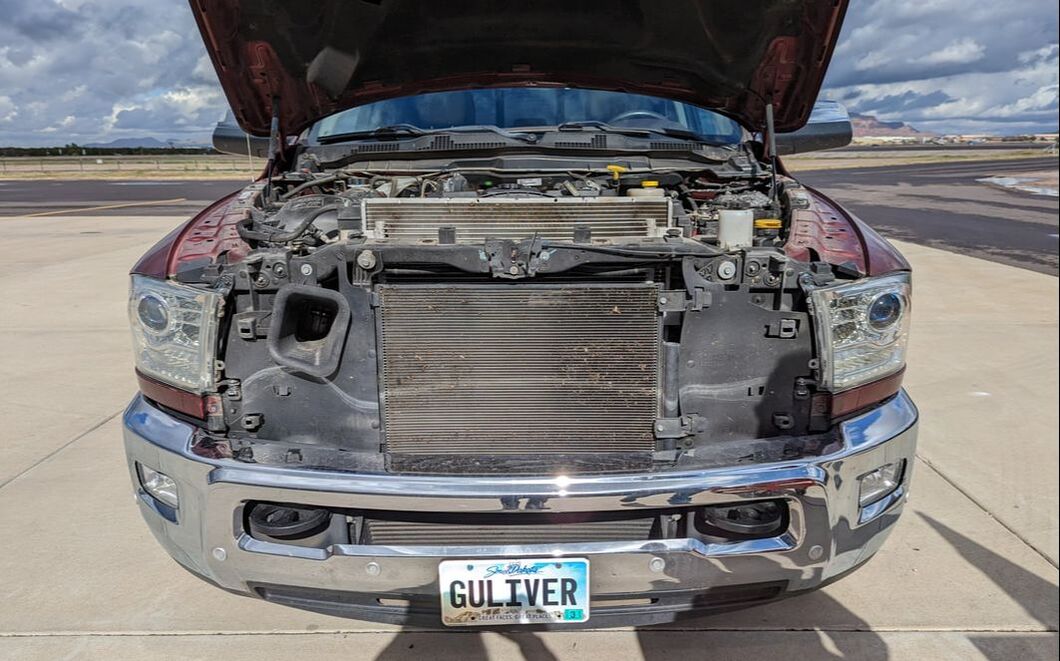
 We had talked about getting a grille guard for our truck since embracing our RV lifestyle. After all, if anything were to happen to Gulliver, we might be unable to relocate our house on wheels. Despite that reality, other priorities on our wish list kept pushing a grille guard lower on the lineup. With a drive to Alaska in our sights, we decided the time had come to invest in protecting our hardworking truck from potential damage as a result of a collision with an animal or another vehicle. Evaluating Grille Guard Options Grille guards come in lots of types and price points and have many names — bull bars, push bars, brush guards, bumper guards. Most are made of steel. Some consist of a combination of sturdy metals, such as polycarbonate, aluminum alloys, and/or steel. Some are bolt-on additions whereas installing others is a lot more involved. We started noticing these parts on other trucks and assessing what would work best for our needs. A bolt-on one would fit our budget and provide some protection, but we wanted to be able to use our parking sensors — especially since the addition would extend the length of our 23-foot truck. Fitting it into a parking spot requires all the help we can get. The bolt-on grille guards we found, although supposedly easy to install, didn’t extend the parking sensors to the additional length of the new equipment. So, our search for the right grille guard continued. While camping at South Llano River State Park in Junction, Texas, a beefy grille guard caught our attention. Upon closer examination, we noticed diamond plate material attached to the grille guard replaced the entire front bumper. The owner saw us admiring the piece and came to talk to us. We explained the situation and our concerns about the parking sensors. He informed us the sensors had been extended for his equipment and showed us the proof. We were sold on a Ranch Hand front bumper rather than a basic grille guard, a cost difference of upward of $700. We knew that, despite the additional cost, this solution would give us the most peace of mind. So, we saved the money and purchased a Ranch Hand Legend Front Bumper. Replacing the Front Bumper 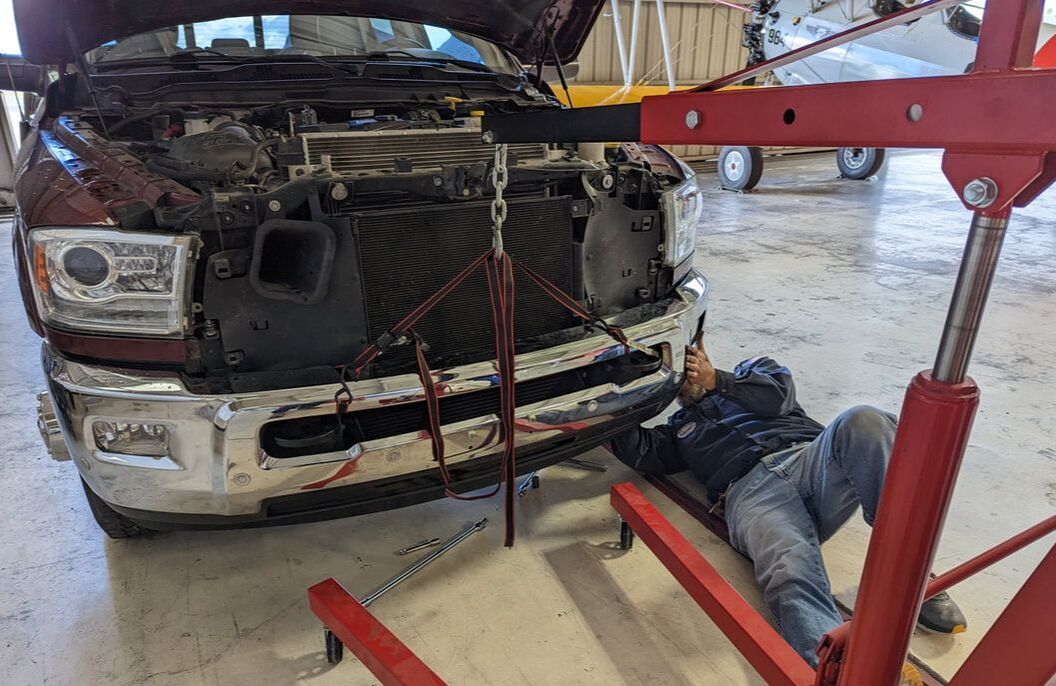 Installing the new equipment meant first removing the original bumper. We strapped the factory bumper to an engine lift to hold it in place as it detached from the truck and started loosening nuts and bolts. Having disconnected the factory bumper from the truck, I busied myself with installing grommets for the parking sensors into the new one, along with our fog lights. 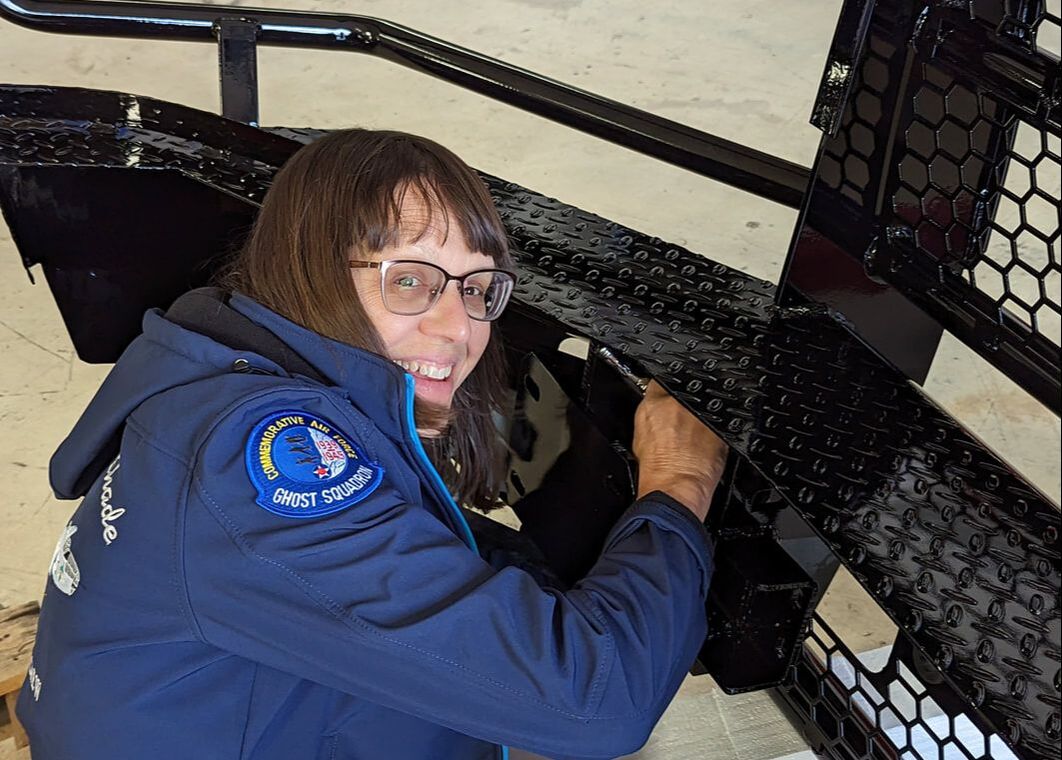 Because of the way the original bumper had been installed, we couldn’t dislodge the bolts holding its brackets in place. The radiators prevented enough wiggle room to back the bolts out of their holes. Without removing those brackets, we couldn’t attach the new bumper. The factory bolts had to be cut off. There was no other way around it. Our Commemorative Air Force friend, Chris R., came to our aid. He used a Sawzall to slice through the bolts. The loud grinding noise assaulted our ears, and the process proved more arduous and time-consuming than we had hoped. But the Sawzall got the job done. 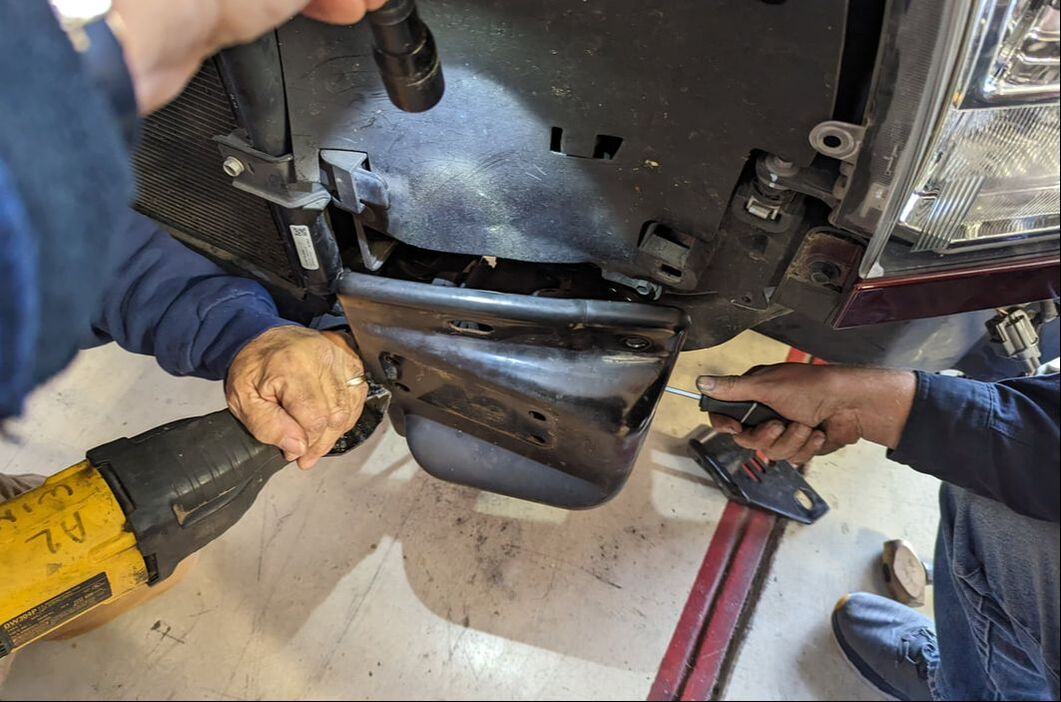 Able to carry the factory bumper on my own, I loaded it into the bed of the truck. We strapped the new, 300-pound bumper to the engine lift, thankful we had the right tool for the project. Although we had invested about five hours into the face-lift, we had gotten a late start. Because of that, we couldn’t complete the job in one day and had to leave Gulliver overnight. He looked sad. We left the new bumper on the engine lift and caught a ride home. 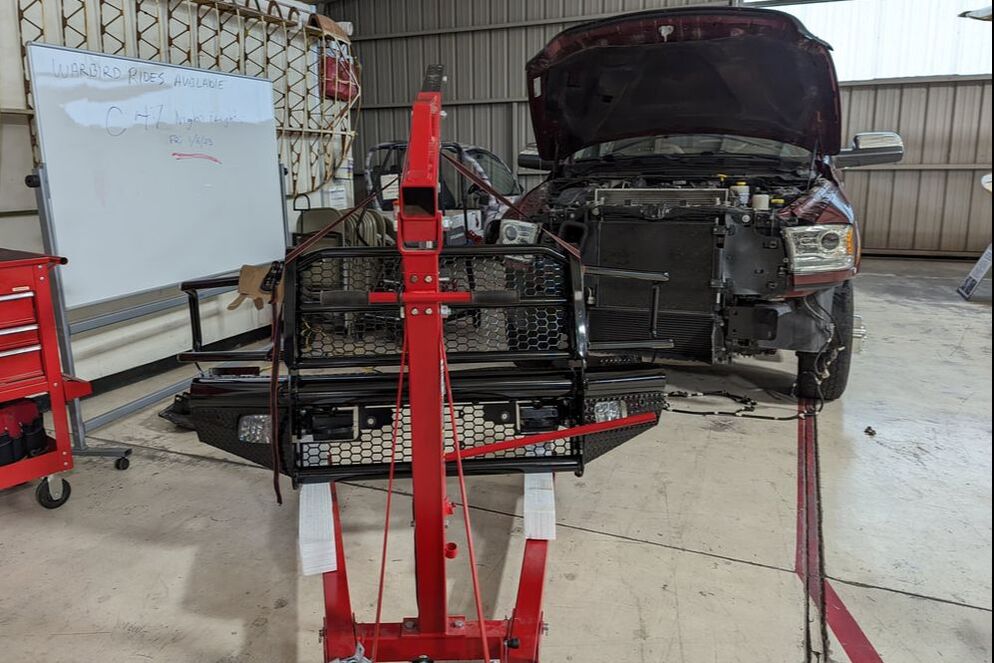 Finishing the Procedure The next morning, we returned to complete the job. We appreciated the help of friends Bob T. and Tim T., who graciously volunteered to help both days. It took the four of us to guide the new bumper into position and secure it to the truck. 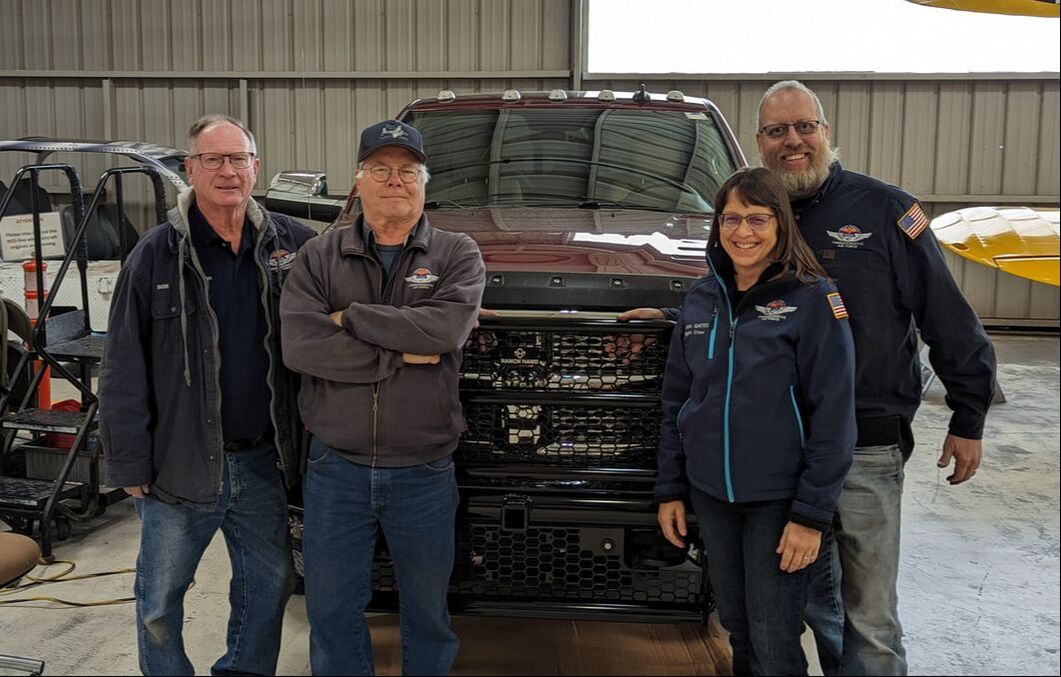 Gulliver looks beefier and is about a foot longer. He drives differently too. We can feel the weight in the front while traveling down the road. For the importance he provides to us and our lifestyle, we’re glad we took the plunge and upgraded his grille. And we were able to sell the factory bumper the same day we brought it home. Onward to more adventures. You might also like Gulliver Gets a Transplant. 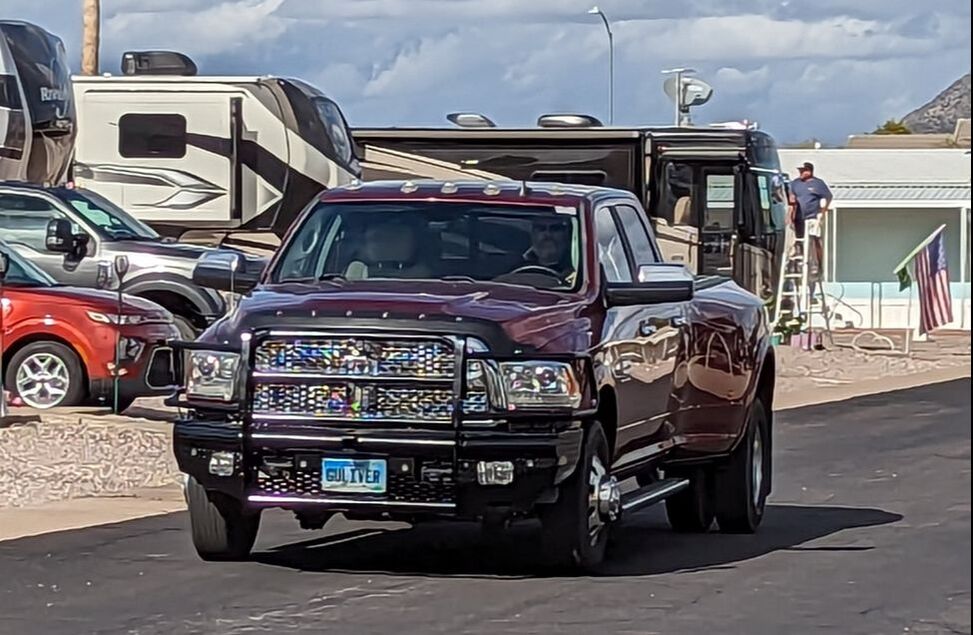
0 Comments
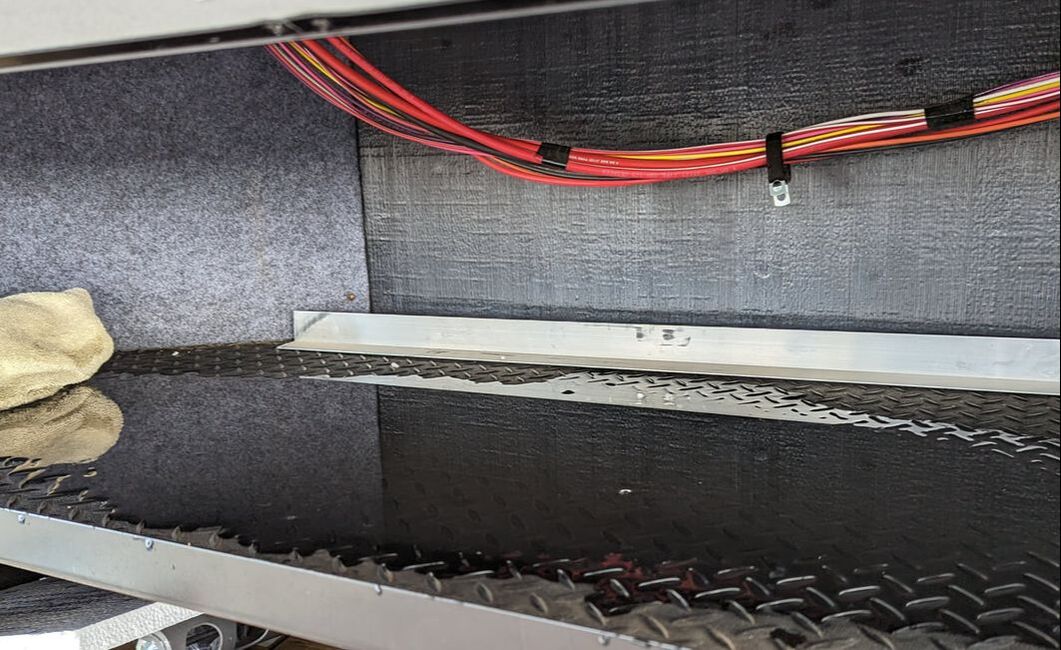 We thought we had fixed our water leak and made our rig watertight. After a very rainy day, I ascended the ladder on the back of Tagalong to sweep any remaining liquid off our slideout toppers. While on the roof, I decided to check the front section where we had repaired our leak. I couldn’t believe my eyes. Our self-leveling caulk, which had looked fine when we left it following our repair job, had holes in it, leaving pathways for rain to get through. Trapped moisture under the new caulk must have tried to escape, causing the holes.  Climbing down, I opened the front compartment, ran my hand across the foil bubble wrap ceiling, and was astounded at how much water came out. Yep, we still had a problem. Stopping the Drips A rainfree weather forecast meant we had time to let the roof and compartment dry out before readdressing our repair job/roof leak. Fearful we’d have to remove the foam insulation we had installed, we once again peeled back the bubble wrap ceiling. Not finding an obvious source of water, I investigated further. And then I discovered it. Rainwater had nestled into the fiberglass insulation up under our bedroom closet, in a difficult-to-reach spot from the front compartment. We decided to leave the compartment open to help it air out. Daily, I sopped up what I could from the insulation as the fluid tried to escape our rig. 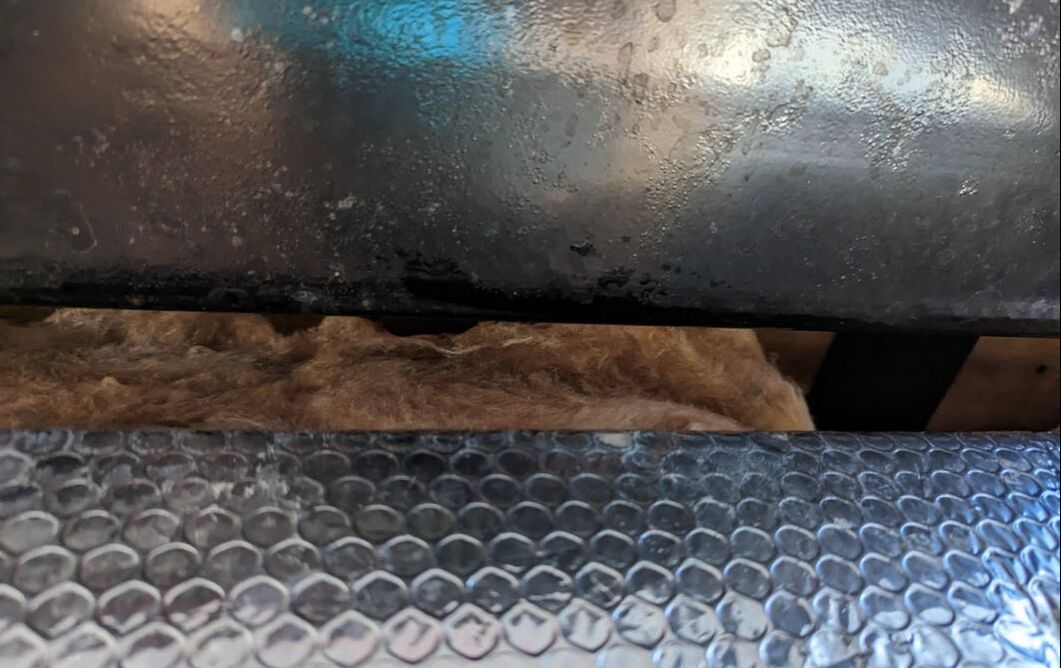 After a few days, we climbed onto the roof and filled in the holes at the Eternabond/caulk seam. The next day, I ascended the ladder to confirm the fix worked. Thankfully, it did. That just left the slowly moving water trying to work its way out. After many days and nights of squeezing moisture out of the insulation and leaving the front compartment open, the flow finally stopped. From Leaks to Clogs Water problems generally come in two forms: clogs and leaks. After the roof leak, our Thetford RV toilet stopped opening to flush. Since this happened while we were at a mobile home/RV park that houses some residents year-round, we were able to use the clubhouse restrooms in the interim. Although stuck (pun intended), we weren’t completely stuck. Bob researched solutions and ordered a new ball valve for the toilet. Replacing the part meant uninstalling the commode from the trailer and detaching the ceramic bowl from the plastic base. You can imagine the messy job that was. With the new part in place, we reinstalled the Thetford john, thrilled not to have to go to the clubhouse restrooms anymore … or so we thought. We quickly learned we had a faulty ball seal that prevented the toilet bowl from holding water. Guess you could say we had another leak. We went from one extreme to another — both resulting in not being able to flush the toilet properly. Attempting a Reinstallation We decided to replace the whole unit, something we probably should have done from the start. Bob researched our options and ordered a Dometic. Meanwhile, back to the clubhouse we went. When the toilet arrived, we swapped the original for the new. The process didn’t go quite as smoothly as we had hoped or wanted. With the old latrine out of the way, we put the new one in place. But somewhere along the line, we lost one of the washers needed to complete the job. After 15 minutes of searching, Bob realized the washer could have fit through a small gap underneath our shower. He tried numerous times to fish it out, to no avail. On to Plan B. We dug through our tools in the truck for some washers that would work and found brass, a much better option for a wet environment than the factory-provided steel washers. 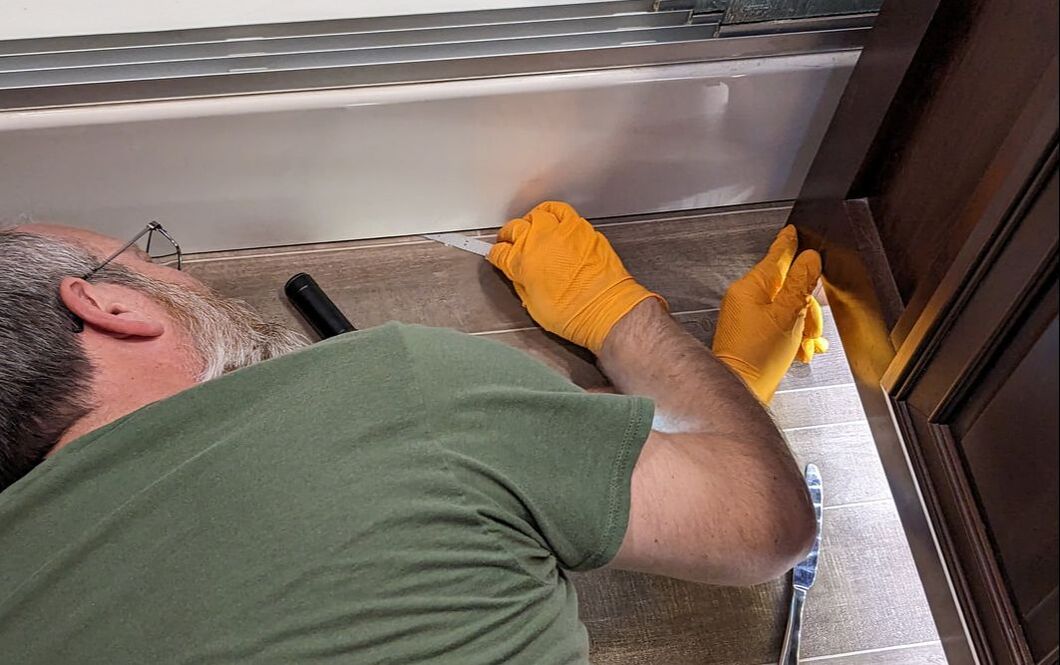 With the installation complete, we delighted in the new throne’s residential feel, thanks to a ceramic bowl and painted wooden seat and lid, and its superior rinsing mechanism that surrounded the bowl instead of just spraying from the back, like the old commode. Happy with a job well done, we left the trailer to deposit the old unit in a dumpster. 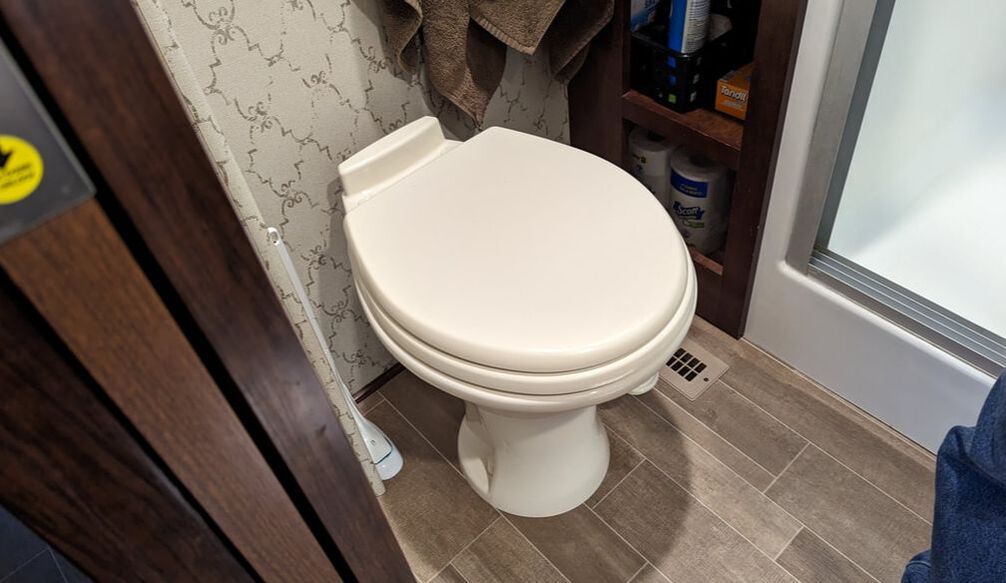 Upon our return, I opened the toilet lid to discover a dry bowl. Not again! Yep, we still had the same problem: Our toilet wouldn’t hold water. More research provided tips on how to fix the ball seal. Bob tried the recommended steps, but the problem persisted. Clandestine Operation The potential to have to return the new toilet meant we had to fetch the old one from the trash. Dumpster diving had served us well early in our marriage. Then, we got some decent furniture from our escapades. It didn’t hold the same appeal in this situation. We drove our noisy diesel truck through the mobile home/RV park at 10:30 p.m. to the nearest dumpster, in close proximity to another RV. We had put the old toilet in the box the new one had come in. Getting it out of the dumpster proved easy enough, and no one appeared to see us or complain. Our stealthy mission done, we returned home and crashed for the night. 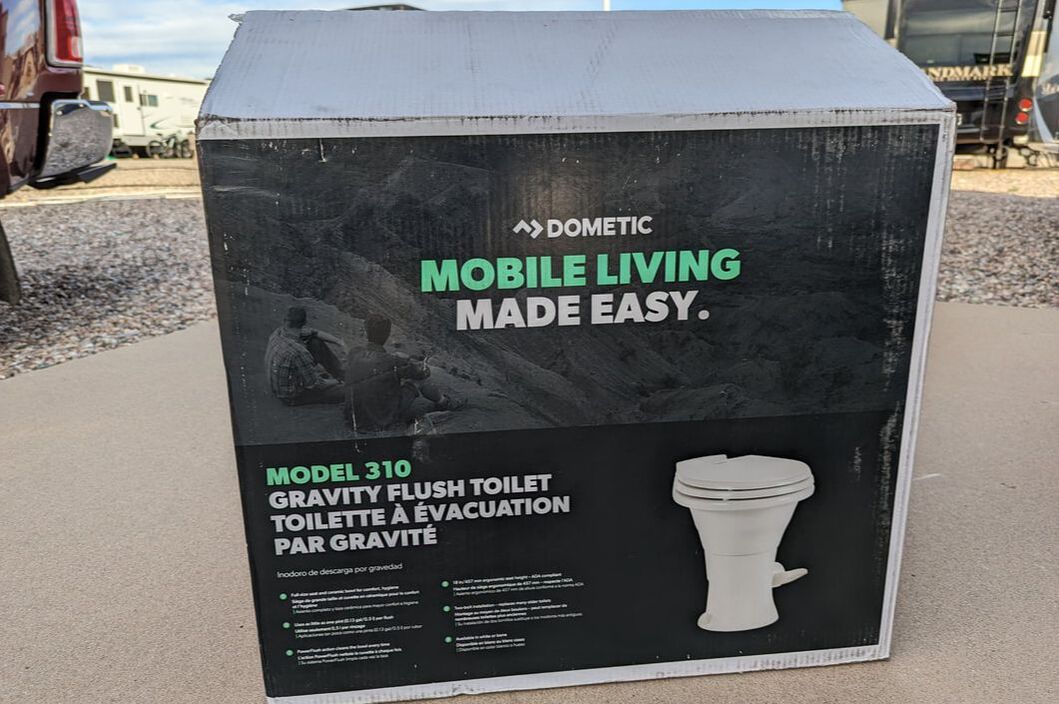 First thing in the morning, I heard Bob on the phone with Dometic customer service to try to resolve our problem. They referred us to the warranty department, which referred us to Amazon, where we had purchased the toilet.
It looked like we’d need to ship the unit back, just as we thought. We had bought through a third party on Amazon, and that third party didn’t want to cover shipping for us to return the toilet. We were facing upward of $30 in shipping costs. Bob once again put his excellent research skills to use and looked into alternative options. Another possible solution involved replacing the seal between the toilet’s plastic base and ceramic bowl. We ordered that piece for only $16 and, sure enough, it did the trick — and didn’t require detaching the unit to complete the job. We’re grateful our water woes are behind us, at least for now. And we don’t have to make any more trips to the clubhouse unless we want to do laundry or linger in the hot tub. You might also like How a Flat Tire Helped Us Work Together. 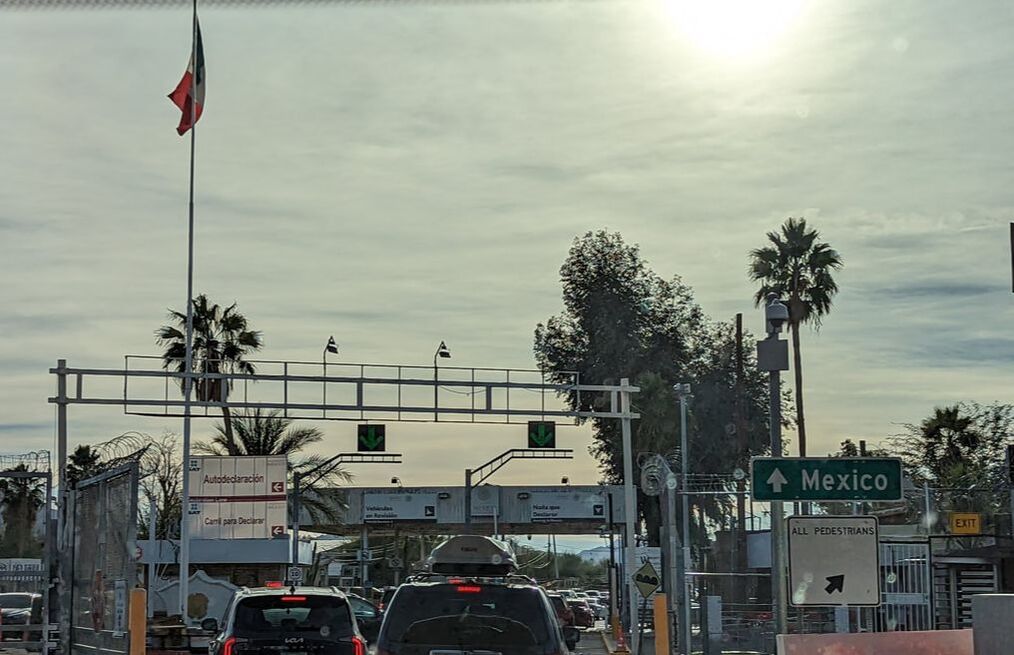 We’ve been to Mexico many times, walking across the border south of San Diego and El Paso. We’ve visited cruise port towns of Cabo San Lucas, Ensenada, Mazatlan, Puerto Vallarta, La Paz, and Progreso. But we’d never made the trek by car. Not willing to take everything we own into a third-world country and wanting to try out our new Fofana truck tent* and AirBedz inflatable mattress,* we packed Gulliver for a sans-Tagalong week of camping in Rocky Point, Mexico — or Puerto Penasco, as it’s known to locals. It’s been a long time since we tented. It involves a bit of work but offers close proximity to beautiful scenery, such as the Sea of Cortez from a sandy beach. Embracing the Adventure Gulliver led us on a four-hour journey across terrain we hadn’t seen before. Because Rocky Point is part of Sonora, Mexico, and considered part of the Border Zone, no permit is required to travel there. You do, however, need Mexican auto insurance, which you can purchase right before crossing the border. We opted to buy it ahead of time online. The route from Phoenix to Rocky Point meanders through Organ Pipe Cactus National Monument, offering beautiful views of cactus set against mountains. Spanning more than 330,000 acres of the Sonoran Desert, the national park is the only place in America where organ pipe cactus and senita (another type of cactus) grow wild. 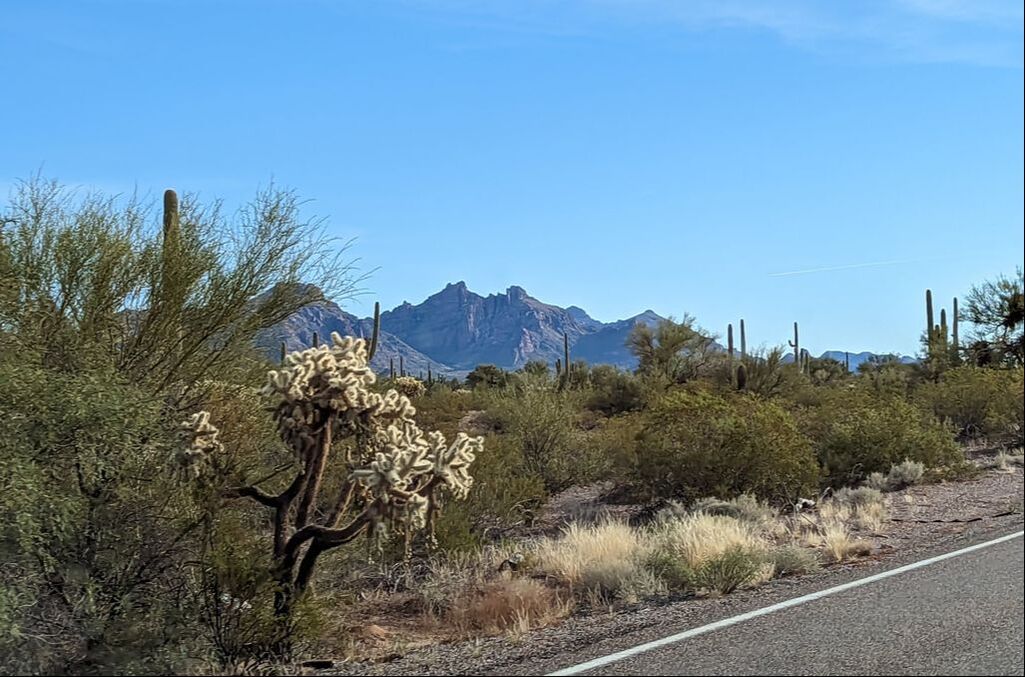 The drive took us through Ajo, population 2,600, a once thriving copper mining town. We also drove through the tiny community of Why, population 65. Originally named Y after its forked intersection that gives travelers the option of going south to Mexico or east to Tucson, the town became Why when state law required all city names to have a minimum of three letters. Today it features a convenience store titled Why Not? As we approached the border town of Lukeville, we started seeing signs about crossing into Mexico. “Weapons and Ammunition into Mexico is illegal” read a prominent one. We waited in a short line of vehicles to drive through a tentlike tunnel before reaching another country. The Mexico border patrol agent waved us through without a word, and we were on our way. Driving in Mexico Getting to the beach involved navigating the Mexican town of Sonoyta for about 10 minutes before reaching the main drag connecting America to Rocky Point. The 65-mile-long road is labeled a hassle-free zone. We didn’t know what that meant. It being our first time driving in Mexico, we did our best to obey the traffic signs, watching our speed in kilometers. Other Americans whizzed past us, and we quickly learned hassle-free means the Mexican police don’t patrol that road. We did, however, see a service truck cruising it to help any drivers who broke down. Entering Rocky Point, we exited the main road and followed Google’s guidance to our selected beach campground, Concha Del Mar, offering dry camping (no hookups) for $15 US per night. Most places of business in Rocky Point accept U.S. dollars and list prices in both U.S. and Mexican currency. Not wanting to have change in pesos, we took plenty of U.S. cash with us. Fishy sea air greeted us as we rolled down our windows. The campground attendant took our cash for four nights and told us to park in the second row from the water. We found a decent spot among the 50 or so RVs and set up our tent and mattress in 10 to 15 minutes. 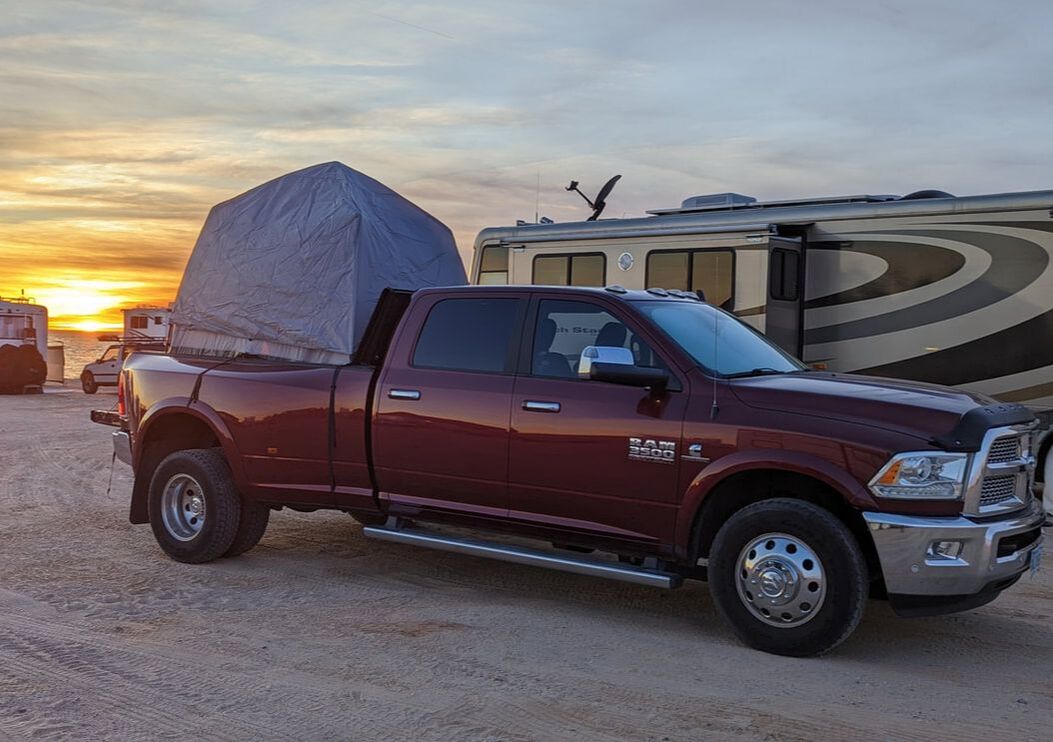 Camping on the Beach The mattress proved comfortable. We slept well, thanks to the lulling of the crashing waves. The only negative was our bladders waking us. That meant putting on our shoes and leaving the warmth of the tent to walk 75 yards to the bath house. But it also provided stargazing opportunities we would have otherwise missed. Having purchased a Firemaple camping stove* for the trip, we took some dehydrated meals such as pho and oatmeal cups with us. We just had to heat water. The stove boiled water within 2 minutes and made for quick, easy breakfasts. We also used it to make our morning coffee. 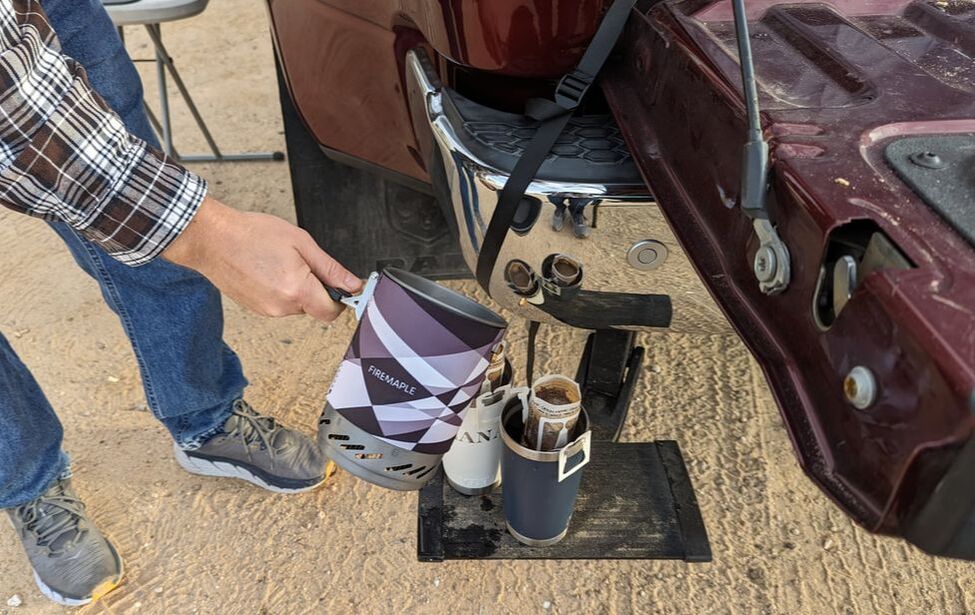 When the wind prevented us from sitting outside, we hung out in the cab of the truck, listening to music, reading, and playing games. We set up our solar suitcase to restore power to the truck after using it to charge our phones. Although we both took laptops with us, we didn’t open them, except one night to watch a movie. Experiencing Mexican Cuisine Leaving our truck and tent setup among our camping neighbors, we walked the beach every day and traveled by foot anywhere we wanted to explore. The closest restaurant, connected to a hotel on the beach, featured amazing views of the water and sunsets. We dined there a few times, as well as at a few other restaurants, reveling in the authentic Mexican food.  We happened upon what quickly became our favorite dish of the trip when visiting the New Mexican Restaurant. Some fellow Americans in the establishment recommended we order the New Mexican Molcajete. We obliged. A short time later, we received a stone bowl filled with a green chili cream sauce and overflowing with chicken, beef, shrimp, and chorizo. Accompanied by fresh corn tortillas, the dish hit the spot, and we made sure we had it again before leaving the area. 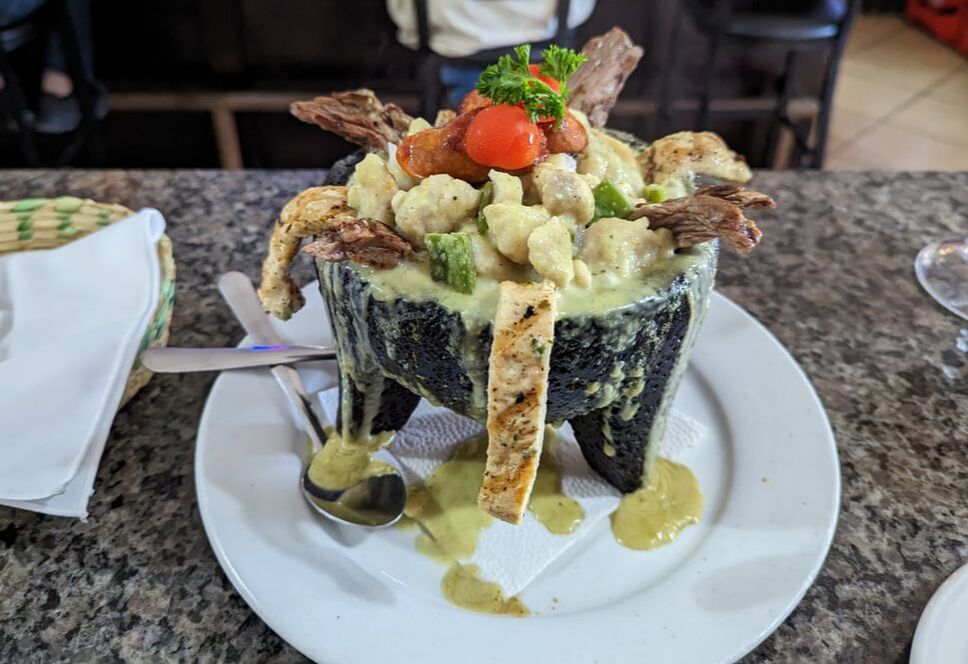 One day, we ventured into town in search of fresh seafood. After lingering over an amazing lunch of fish tacos and ceviche (including octopus), we picked up some Rocky Point shrimp and scallops. The shrimp made its way into our lunch the next day. Returning to America We left Rocky Point on a beautiful, sunny Friday morning to return to America, passing many vehicles going the opposite direction. We had to wait in line for 20 to 30 minutes to cross the border. Other than locals approaching us to buy their wares or clean our windshield for a donation, it was uneventful. A border patrol agent glanced at our passports and gave us entrance to the U.S. We stopped in Ajo for a taco lunch to round out our Mexican experience and took a different route home, surprised to be greeted by cold and clouds threatening rain. We hadn’t realized how busy we’d been until we stopped moving. The downtime away offered much rest and relaxation. We met wonderful people, enjoyed fresh seafood and authentic Mexican cuisine, and basked in the beauty of our surroundings, thankful for a time of refreshing and reconnecting. You might also like Experiencing the Albuquerque Balloon Fiesta. * As Amazon affiliates, we earn from qualifying purchases. 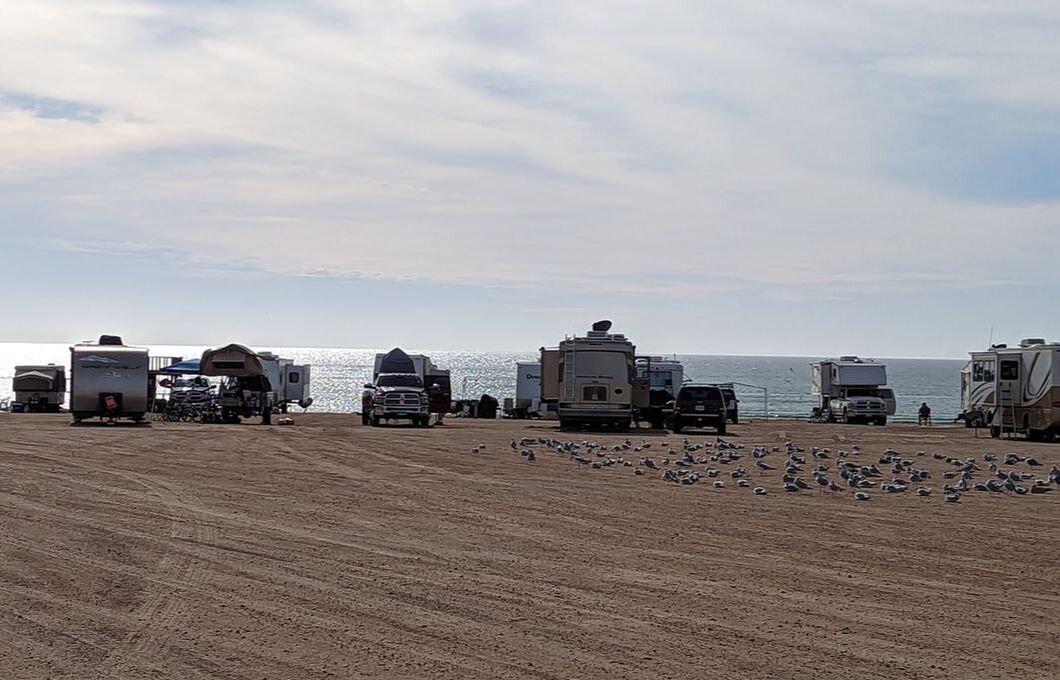  We had planned to organize our RV cellar to make room for some new ground-mounted solar panels. Opening our cellar compartment, we found something no RVer ever wants to find: a puddle with no clearly identifiable source. The small puddle could have been a fluke, so we opened the front compartment … and quickly wished we hadn’t. More water greeted us. But where did it come from? We pulled out three waterlogged boxes and saw a drip. Pushing up on the foil bubble wrap ceiling in the compartment forced more water out. We opened a side compartment and pushed on the ceiling from there. Yep, more water. Returning to the front compartment, the foil ceiling felt heavy and cold to the touch. We milked much of the water out — probably about a half gallon. But we still needed to find the source. In Search of the Leak I climbed onto the roof, something neither of us had done in many months. We had hired a guy to clean our rig in October. He told us the roof looked good and mentioned some issues toward the front where the rubber membrane meets the nose cap. We assumed he was referring to a known issue from when we ripped our roof in 2020, so we didn’t bother following up. We wish we would have.  The Eternabond tape we had used to secure our ripped roof membrane back in place under the nose cap had lost some of its stickiness, probably due to wind, exposing some screws and the seam. A day of steady rain a week earlier must have allowed water to get into the trailer and find its way to our compartments. Thankfully, it didn’t make its way into the interior of the rig. So much for organizing the cellar. A new project lay before us: peeling off the old sticky Eternabond and self-leveling caulk that spanned the width of the roof. Two hours later, with our hands ripped and blisters on both of my thumbs, we succeeded in removing the goop and replacing the Eternabond tape.  We ventured to Camping World to purchase enough self-leveling caulk to complete the roof job the next day. It went much smoother and faster — and was easier on our hands. 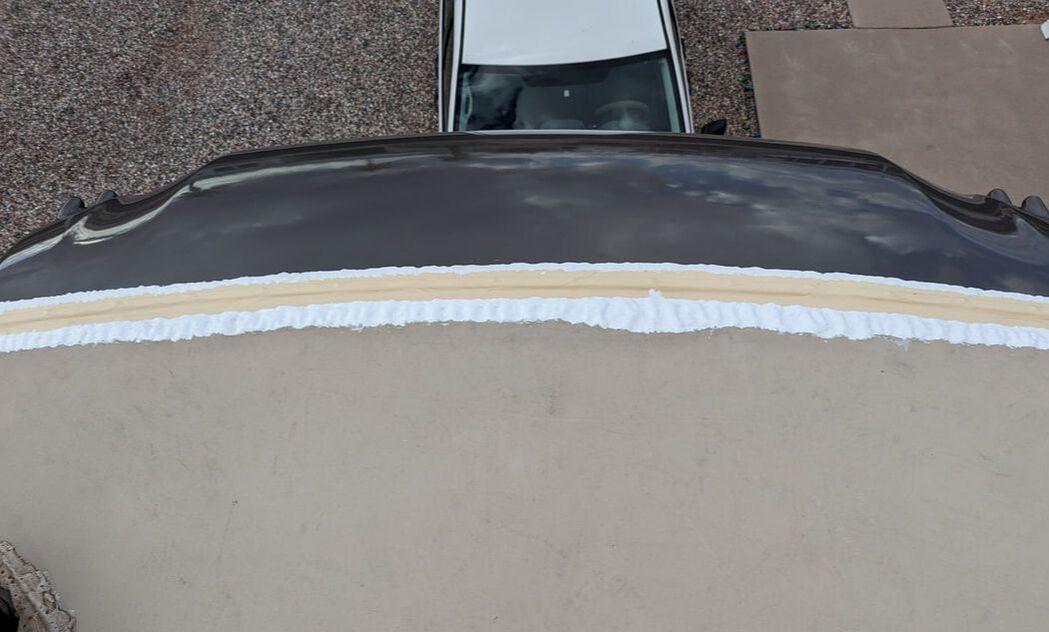 Still More Water Rain the following day tested our handiwork. Our patch job held up to the elements. But when we checked the compartment where we had originally found water, we found more, much to our chagrin. Again, we rubbed along the ceiling to force as much water out as we could. We also took the opportunity to reseal any other ways the water might have gotten in: seams around windows and along edges and trim — and just in time. That night we got more rain. Eager to find our water issue solved, we peeked in the front compartment. No visible evidence of water. But, once again, rubbing my hand along the ceiling brought more water out from hiding. Bummer! Although confident our patched roof and resealed seams withstood the downpour, we were dumbfounded as to the source of the accumulation. We emptied the trailer cellar of its contents so we could get behind the walls protecting the plumbing. Examination revealed no evident leak, other than an old one from our water pump. With easy access to that, Bob replaced the pump while I repeatedly pushed the water-laden compartment ceiling from one end to the other until I hardly got anything out. 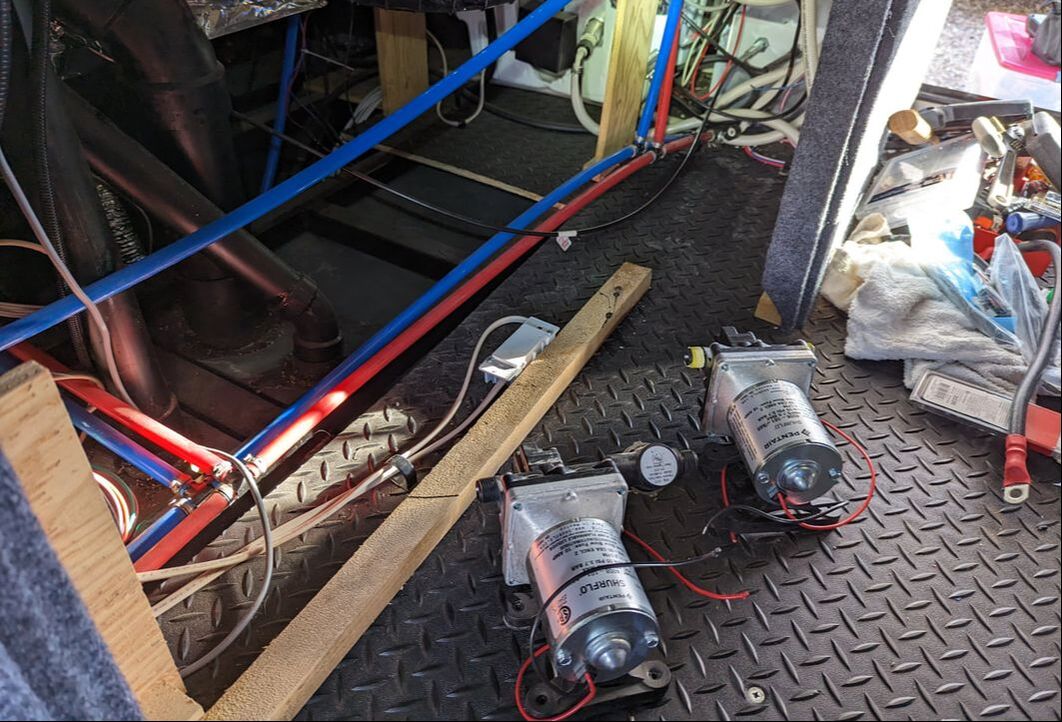 We theorized that we must not have gotten out all of the water from the previous rainfall. Some must have been trapped in the insulation above the compartment ceiling and released after we closed that compartment the last time. Down to Bare Pipes After a rainfree day, we still found we could get water out of the front compartment ceiling. Bob had an epiphany: Our rig is plumbed for a washer and dryer, and those pipes sit above the apparent source of the leak. He pulled a panel off the bedroom closet to access the pipes. Moisture clung to the bottoms of the pipes. Condensation, perhaps? Putting our heads in the opening, we could see discoloration on the fiberglass nose cap, indicating part of it was wet. That fit our theory about the water working its way out from the roof leak.  We pulled out the dresser drawers to expose more pipes and found moisture there as well. Leaving both areas open to air out, we set up some fans to circulate air in and out of the nose cap area. After about three days of that, we still got water out of the front compartment. Our only remaining option to truly get to the source of the issue was to peel back the foil bubble wrap ceiling in the compartment. Why hadn’t we done that from the start? It involved removing some screws, and we weren’t sure we’d be able to get it back into place. Clearly, it formed a moisture barrier, so we didn’t want to compromise its integrity. We peeled back the ceiling and found a little more water … and a soaked corner of the fiberglass insulation. But that was it. Our theory proved true: The water had been steadily working its way out of the rig from the original source of the leak in the roof. 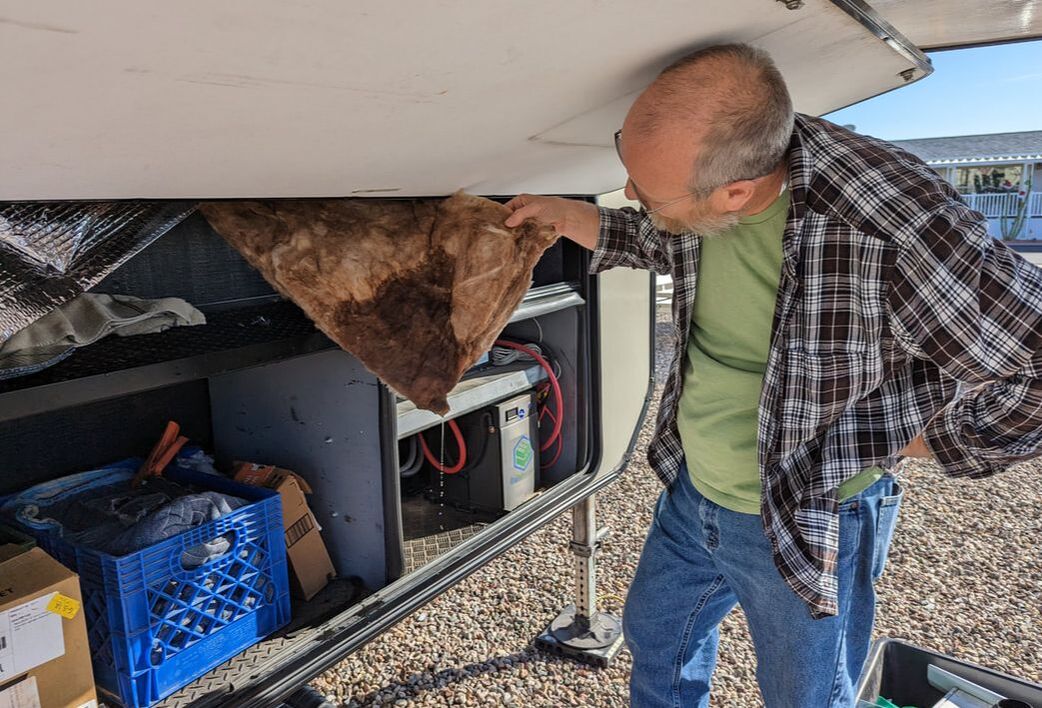 We replaced the fiberglass insulation with foam and put the ceiling back together. After a week of water woes, our rig is once again watertight.
You might also like Our Biggest Challenges in Our Third Year of RV Travel. |
AuthorThis is the travel blog of full-time RVers Bob and Lana Gates and our truck, Gulliver, and fifth wheel, Tagalong. Categories
All
Archives
July 2024
|
 RSS Feed