The inability to easily verify proper torque on the electrical connections to a power inverter charger and associated wiring in an RV can be dangerous. The vibrations from driving down the road and hitting bumps can loosen connections, resulting in heat and, potentially, fire.
After seeing full-time RVing YouTubers HappilyEverHanks experience a fire and power outage due to a loose AC connection to their Victron inverter charger, Bob wanted to be proactive and ensure we had easy access to the wire connections to our Victron MultiPlus-II unit. This is vital as the unit provides uninterrupted power to our entire rig, whether we’re plugged in or camping off grid.
Identifying the problem
An inverter charger has two functions:
Because an RV is mobile, it’s imperative that an inverter charger is secured to the rig to minimize shaking as much as possible as the RV moves.
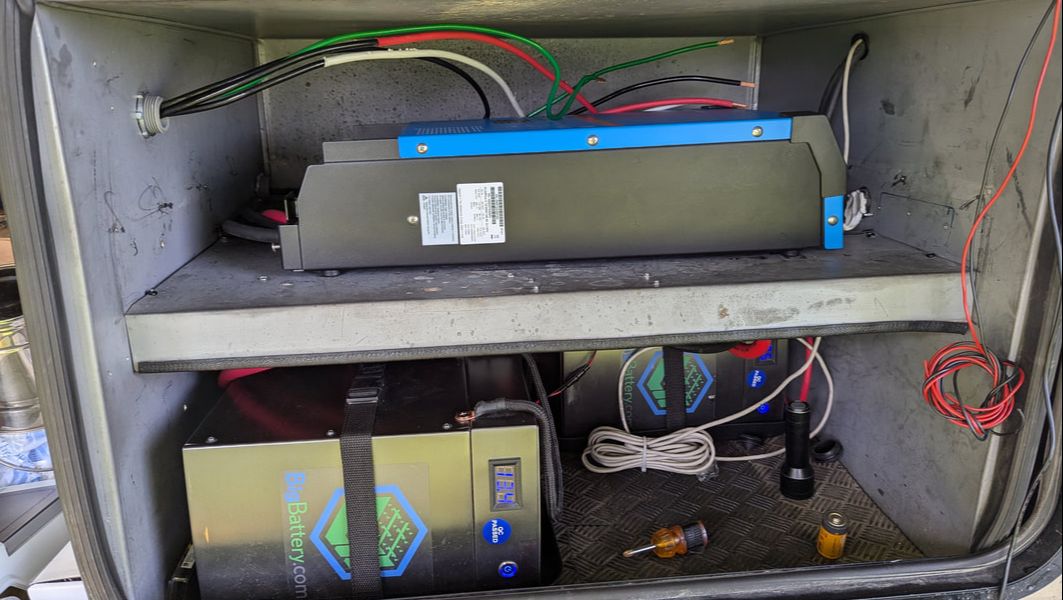
When installing our Victron unit two years ago, Bob attached it to a shelf that ran the depth and width of half of the front compartment of our coach. He connected the unit to three lithium iron phosphate batteries underneath the shelf using bus bars to combine the positive wires and the negative wires. But there was no way Bob could get to the DC connections to check their torque without disassembling the setup.
While I was out of town on a business trip, he got to work rewiring the Victron inverter charger to alleviate that problem.
Changing the setup
Fixing the issue required a complete change to our Victron setup. First, Bob disconnected all the wiring to the Victron unit and bus bars. Then he removed the Victron MuiltiPlus-II and the shelf that had held it in place.
After seeing full-time RVing YouTubers HappilyEverHanks experience a fire and power outage due to a loose AC connection to their Victron inverter charger, Bob wanted to be proactive and ensure we had easy access to the wire connections to our Victron MultiPlus-II unit. This is vital as the unit provides uninterrupted power to our entire rig, whether we’re plugged in or camping off grid.
Identifying the problem
An inverter charger has two functions:
- Turning AC, or shore, power into DC, or battery, power to run things like lights and the water pump
- Taking DC power from the batteries when not connected to shore power and turning it into AC power to run outlets, the microwave, and the TV
Because an RV is mobile, it’s imperative that an inverter charger is secured to the rig to minimize shaking as much as possible as the RV moves.
When installing our Victron unit two years ago, Bob attached it to a shelf that ran the depth and width of half of the front compartment of our coach. He connected the unit to three lithium iron phosphate batteries underneath the shelf using bus bars to combine the positive wires and the negative wires. But there was no way Bob could get to the DC connections to check their torque without disassembling the setup.
While I was out of town on a business trip, he got to work rewiring the Victron inverter charger to alleviate that problem.
Changing the setup
Fixing the issue required a complete change to our Victron setup. First, Bob disconnected all the wiring to the Victron unit and bus bars. Then he removed the Victron MuiltiPlus-II and the shelf that had held it in place.
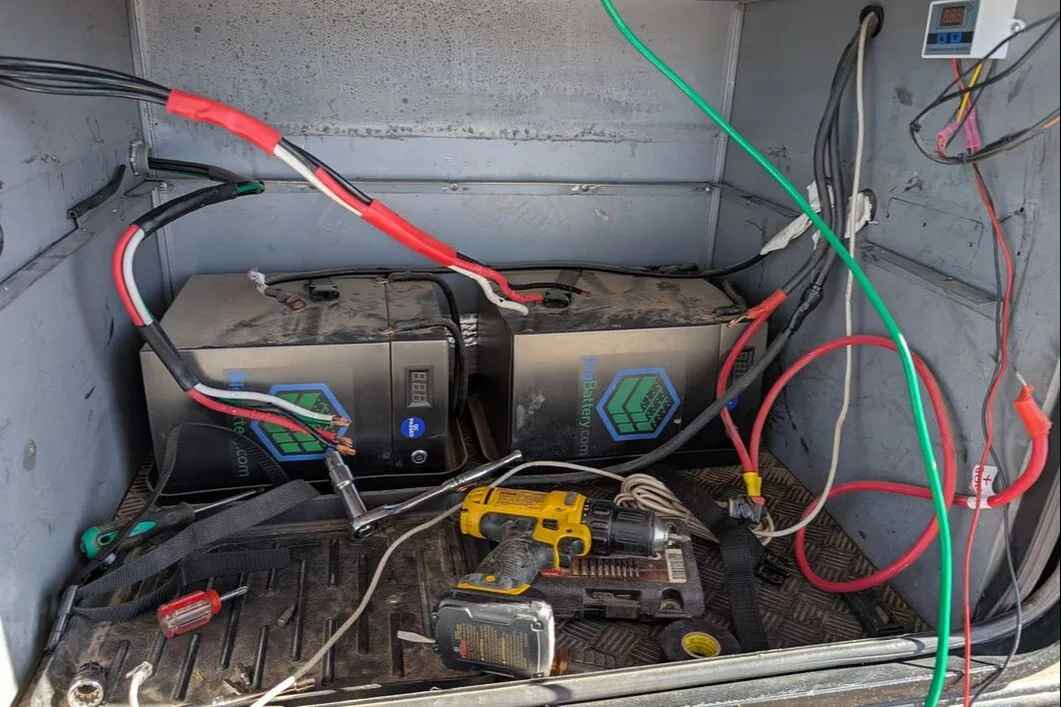
To be able to get to the connections, Bob cut the shelf down to 6 inches deep and shortened the width of it to allow space to connect the heavy-gauge wires to the three lithium iron phosphate batteries underneath. The batteries could stay on the bottom of the compartment as they were. But for optimal wiring, Bob had to reposition two of them.
He reinstalled the adjusted shelf lower in the compartment, attaching it to the back of the cabinet. Then he beefed it up with angle iron running the length of it and added L brackets on each side for extra support.
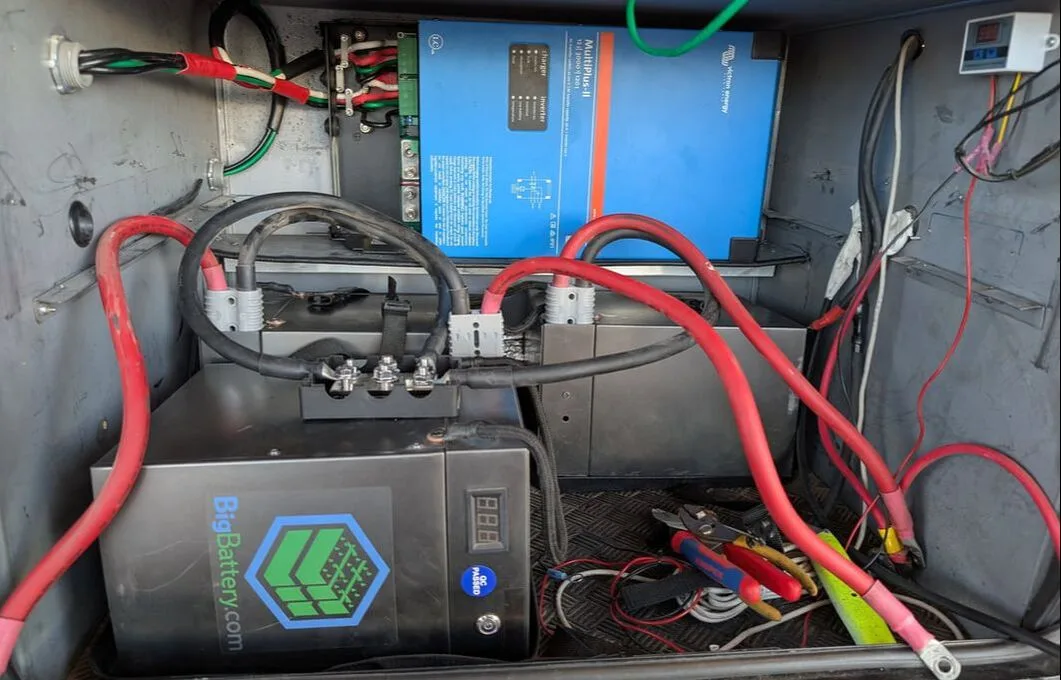
Bob mounted the 48-pound Victron unit on its side and attached it to the shortened shelf.
He reinstalled the adjusted shelf lower in the compartment, attaching it to the back of the cabinet. Then he beefed it up with angle iron running the length of it and added L brackets on each side for extra support.
Bob mounted the 48-pound Victron unit on its side and attached it to the shortened shelf.
Connecting the batteries
After many painstaking hours, it was time to connect the batteries to the Victron unit.
Together, the three batteries can carry up to 300 amps–100 each battery. Realizing that power required joining the batteries together–negative terminals to negative and positive terminals to positives.
Bob connected the positives to one bus bar rated for 500 amps that he mounted on the ceiling of the compartment, and he connected the negatives to another 500-amp bus bar on the ceiling.

The compartment may not look as pretty and clean as it used to, but Bob is breathing easier knowing he can periodically check the torque on the DC connections.
You might also like What it’s like to live off-grid in an RV.
You might also like What it’s like to live off-grid in an RV.
I hope you sail on down the road safely and securely after your hard work!